Monday, June 17, 2019

60 mortises later...

A while ago I began to work on an extension to my workbench, starting with the workbench legs. After having done the 4 front legs I took care of the 4 back legs.
This time I used my new Stanley 49 auger bit depth stop instead of a simple piece of tape. I got this one recently and was eager to use it.

The Stanley 49 depth stop.

I must admit that I am very pleased with it. At first sight it did not inspired me much but it revealed to be a nice little addition that held well on the bit, is easy to set, and much more precise than a piece of tape.
I applied to the back legs the same recipe as for the front legs, that is to say that I drilled out the mortise waste using the hand brace and then cleaned/chopped the mortise with a chisel. With the back legs the side mortise are located 1/2 inch from the leg side so I needed to be careful when chopping the waste so not to get a split leg.

Chopping the waste at 1/2" from the side.
After a while, and 60 mortises later, I am done with the legs.

A bunch of mortised legs.

Next is to take care of the stretchers. I traced the tenons using a marking knife, then highlighted the mark using a pencil.

The tenon traced on the stretcher.
Note that the tenon is starting from the top of the stretcher.

I then made a kerf on the waste side using a chisel so to guide the saw blade.

Kerf to guide the saw blade.

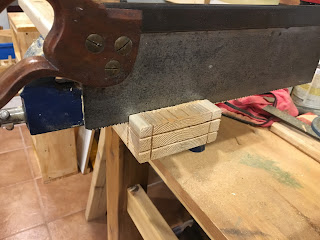
It takes some time to make these kerfs before sawing but I find it far easier and quicker to have a clean saw cut using this technique. I start with the crosscut of the tenon shoulders, checking to stay square during all the cut.

Tenon shoulder crosscut.

Clean square cut.

Then follows the rip cut...

Tenon shoulder rip cut. Note that the waste at the bottom
of the tenon is already removed on that picture.

The result is satisfying for me, I will clean the shoulders with the shoulder plane when I will adjust the tenon to its mortise.

A freshly cut tenon on the top stretcher...
...and a bunch of them.


A hair larger than 1/2 inch.

Next is to apply the same recipe to the bottom stretchers, so I start with the marked line and kerf...

Bottom stretchers marked and kerfed.
For these ones the tenon is centered.

...then cut square following the kerf. For these ones I started with the rip cut, followed by the cross cut.

Rip cutting the tenon...

... then cross cutting to remove the waste.

After 60 mortises, the 60 tenons were done, next will be to assemble all these, but before that I deserve a cold one!

Tuesday, June 4, 2019

Planning for a Roubo bench

Some years ago, my dad came to visit us and took the opportunity to build a pergola over my backyard deck. To build it, he used some really massive white pine slab cut on demand by a nearby sawmill. To give some proportion, the two main posts are 10"x10", the rafters are 4"x6" and the main rail is 4"x10".

Quite a massive frame.

Since then, I have some leftover that are drying for 4 years in my backyard.

A bucnh of massive slab waiting to find their utility.

These left over are white pine and of the following size:
  • One 10" wide, 4" thick, 17' long.
  • One 7" wide, 5" thick, 9' long.
  • One 5" wide, 4" thick, 17' long.
This one will be cut in two pieces and assembled.

Looking at the size of these pieces, they would be a perfect choice to build the Roubo bench I want for such a long time. By assembling the first two slabs I will get a 27" wide, 8' long, 4" thick top. The central part would be 1" thicker, I may plane it to 4" or leave it as is, not sure yet.

The bench top, made by assembling two 10"x4" with a 7"x5".

 The last slab will be cute to make the legs that will be 4"x5" and 32" in height.

While I like the way Christopher Schwarz built the Roubo bench in his book "The Workbench Design Book", I want to be able to dismantle the bench to make it movable if needed. In other terms, I neither want to glue the stretchers tenons nor to use dowels to lock the legs and the benchtop. Not that I plan to move it here and there but if I build a Roubo bench, I want to keep it and bring it with me in the event I move to another place.

For the assembly of the legs and bench top I don't see it as an issue as the bench top should be heavy enough and the joints strong enough to keep everything in place.

This leaves me with a challenge, how to assemble the stretchers so the bench is stiff enough that it does not rattle and at the same time keep the ability to dismantle it (at least the legs) so I can move it to another location. I know that this can be easily achieved using some nuts and bolts but I do not want any nut nor bolt on my Roubo. One solution to this could be to use tusk keyed through (Thank you Bob) tenons.

For those who don't know (I guess you all know but just in case), a tusk keyed through tenon is a tenon locked by a wedge going through it.

Illustration of a tusk keyed through tenon.

Hopefully the wedge would be tight enough so the bench will remain stiff, and even if the wood dried a bit, I guess that one or two hit on the wedge with a mallet will tighten it enough from time to time.

Before starting to cut everything to length I need to build some strong sawhorses, but that is another story...