This time I used my new Stanley 49 auger bit depth stop instead of a simple piece of tape. I got this one recently and was eager to use it.
 |
| The Stanley 49 depth stop. |
I must admit that I am very pleased with it. At first sight it did not inspired me much but it revealed to be a nice little addition that held well on the bit, is easy to set, and much more precise than a piece of tape.
I applied to the back legs the same recipe as for the front legs, that is to say that I drilled out the mortise waste using the hand brace and then cleaned/chopped the mortise with a chisel. With the back legs the side mortise are located 1/2 inch from the leg side so I needed to be careful when chopping the waste so not to get a split leg.
 |
| Chopping the waste at 1/2" from the side. |
 |
| A bunch of mortised legs. |
Next is to take care of the stretchers. I traced the tenons using a marking knife, then highlighted the mark using a pencil.
 |
| The tenon traced on the stretcher. Note that the tenon is starting from the top of the stretcher. |
I then made a kerf on the waste side using a chisel so to guide the saw blade.
 |
| Kerf to guide the saw blade. |
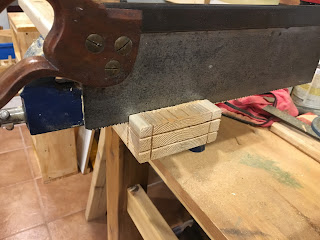
It takes some time to make these kerfs before sawing but I find it far easier and quicker to have a clean saw cut using this technique. I start with the crosscut of the tenon shoulders, checking to stay square during all the cut.
 |
| Tenon shoulder crosscut. |
 |
| Clean square cut. |
Then follows the rip cut...
 |
| Tenon shoulder rip cut. Note that the waste at the bottom of the tenon is already removed on that picture. |
The result is satisfying for me, I will clean the shoulders with the shoulder plane when I will adjust the tenon to its mortise.
 |
| A freshly cut tenon on the top stretcher... |
 |
| ...and a bunch of them. |
 |
| A hair larger than 1/2 inch. |
Next is to apply the same recipe to the bottom stretchers, so I start with the marked line and kerf...
 |
| Bottom stretchers marked and kerfed. For these ones the tenon is centered. |
...then cut square following the kerf. For these ones I started with the rip cut, followed by the cross cut.
 |
| Rip cutting the tenon... |
 |
| ... then cross cutting to remove the waste. |
After 60 mortises, the 60 tenons were done, next will be to assemble all these, but before that I deserve a cold one!

60 mortises and 60 tenons, take at least 2 cold ones :-)
ReplyDeleteBob
I sweat a bit I must admit but it was easier than I thought.
DeleteHow did it take to do the 60?
ReplyDeleteRalph, the longest was to mark all of the mortises and tenons. For each mortise it took around 5 minutes to bore and 5 more to clean with the chisel. For tenons it took less than 5 minutes to cut each.
DeleteHowever marking was what took most of my time. For tenons it took me 2 to 5 minutes to mark with the marking gauge then 5 minutes to chop the small kerf.
In summary count around 10 minutes per tenon and 10 to 15 per mortise, quite some hours of pleasure spanned on few days!
That it about my speed too.
ReplyDeleteBob