Tuesday, April 23, 2019

A good deal... or not

Being on vacation (well deserved believe me) these days I am away from my shop so I won't be able to write much about my projects. However I found a good subject in my sense: buying from EBay.
To be clear from the start, I am not bashing on EBay, I bought a lot of tools from EBay and for me EBay is a great tool that allows all of us to open our horizon about vintage tools. Some day you can find some real steal, some days you may feel some regrets to get some too much expensive tools at auction, but all in all this is a good tool to find what you are looking for if you are a bit cautious.
But everybody can confess that Ebay is also the place where you an find some ridiculous things, real scams.
To illustrate this, here is something I came across while browsing for vintage tools.
A guy ( I am sure he is a great guy anyway) is selling a maple slab, and he is honest, it is a wormy one. You can take a look at it here.
Luckily the seller ask the buyer to understand before bidding, we are all safe!
The slab was 150 years old when it was milled and it has been dried for 100 years more, must be really dry.
The slab is 6'4"x20"x3" and is for sale for the very low price of 1499USD plus the extra 1000USD for delivery up here in Canada. Of course, a slab priceless like this one must be delivered by secured convoy, can you imagine if some get a hand on it to light a BBQ!
If my maths are still good this slab is selling at a great price just shy of 47USD a board feet (not considering shipping price).
But as specified in the description, for this price you can have a piece of history to make your bed (well a 20" by 6'4" bed, may fit your size, not mine).
All this to say that people need to be careful on EBay. Just looking at the slab and having quite a lot of maple around I can say without much doubt that I am pretty sure this one is totally rubbish and the price is just a scam.
But at the same time, the same seller is offering an unopened Coca Cola bottle for just 6000USD, a pre 19 or 20th century god carved thing for 205000USD, or if you want to give a really wonderful gift to your beloved one, he also offer an Italian Ferdinando Ambrosino painting for just 300 000USD. 
I am pretty sure that if you take all you will be able to get a good price for the lot.

To be serious, just be cautious...


Tuesday, April 16, 2019

Vintage tools: Hand brace bits

I recently found a lot of hand brace bits at a very good price that were looking interesting and in good condition. That lot contained an assortment of different bits but I was mainly interested by the center bit set. I already have some of them but wanted to complete my set as I like these bits.

The brace bits lot I received.
When I received the package I was surprised to see that the center bits are in very good condition. The cutting edge and center point are sharp and the bits ready to be used.
Beyond these center bits, this lot contained some interesting items. The following picture is what I think to be a very old variable size bit, or maybe a washer cutter, I am not sure.

Is is a variable size drill bit or a washer cutter?
The next picture shows two other unusual bits that I believe are used to enlarge existing holes.

Bits to enlarge holes?
If anybody has some input regarding these two, please raise your voice!


Thursday, April 11, 2019

Workbench drawers - Finally!

Finally, after the power outage adventure, I am back to my drawer with the hope to put it behind and move onto my next project.
After having cut and rabbeted most of the bottom boards (see my previous post) I need to do the same with the last boards after having cut them to correct depth.
I did a quick dry fit to ensure that the drawer bottom was well inserting in the grove cut on back board.

A quick dry fit to check the last boards assembly...

... I may be a bit anal on dry fit...

Next I cut a bead on each bottom board to make a nicer join. This time instead of using my venerable wooden plane I used my Stanley 45 combination plane to cut the beads. I never tried the Stanley 45 for beading yet so it was the perfect occasion. 
I fitted a 3/8 beading iron that I set to cut thin shavings. The Stanley 45 manual specify to use the beading gauge but in my case it was not possible or I would not have been able to plane to the correct depth. I removed the left skate and attached the fence so it rides on the edge of the board. 
Something I learned is that for the cut to be smooth and easy, I really need to set the blade to a very thin shaving. When each side of the blade start to bite in the wood everything goes easily but while going deeper, as the blade will progressively cut on all its width, the cut becomes also more difficult so making more frequent pass with thinner shaving makes the cut easier and smoother.
When all beads were done I reassembled the drawer.

All the beads cut, time for another dry fit...

...with the back board fitted...

...looking from another angle to be sure.

I applied a coat of 50/50 mix of boiled linseed oil and turpentine to the drawer interior, left it to dry overnight and then applied 3 coats of blonde shellac.
I left the shellac to dry for half a day and made the final assembly by gluing the back board.

Gluing the back board

After few hours the glue was dry enough to check the final result.

The whole drawer finally assembled...

... interior close up...

... stepping back to admire the work!

It is not perfect but I am pretty satisfied for a first try that will reside in my workshop.
To finalize the drawer I need to install the handles and add dowels to the box joins. As I do not have ebony to make these dowels I used what I have handy and dipped the dowels in dark gel stain. These dowels are more for the look than for the strength as the joins are already glued and solid enough for this drawer.
I used my hand brace to bore 5/16" holes in the join tenons and set the dowels.

Boring holes for the dowels with my hand brace.

After having set the first dowel I took a step back to have a look, well I like it! 
I know that these are not square dowels like for the traditional design from Greene & Greene, but like said before this is just an inspiration to me.

First preview of the dowels.

I am also using the same dowels on the two handles, but first I have to glue them in place.

Gluing the handles in place, my Stanley #7 is
perfect to add weight.

When the glue has dried, I bored holes to the drawer side tenons and added dowels.

Dowels on the side too.

I then bored the same size holes on each side of the handles and added the dowels.

First handle with dowels fitted.

Here is some pictures of the final result. The drawer found its way to its final spot.

The drawer in its spot.

Close up view for the pleasure to see it.

Showing the side dowels for my satisfaction.
I am not really happy with the drawer handles. They look too bulky to my eyes.
For the final finish I think I will use simple boiled linseed oil, not sure yet.
Any advice on the finish?

Vintage tools: The mystery saws.

Now that the outage is over and we got back power I will be able to finally pursue on my woodworking project. But before going there I will try to solve a mystery using your knowledge about saws.
I got two small vintage saws and try to discover who was the maker of these two. Here is a picture of the saws.


The two mystery saws.

I first got the one at the bottom. It is a 8 inches saw, the blade is very thin and when I tried it, even if not sharp enough yet, I just loved it.
The blade shows a partial etch where I am able to read "W & TOOLS MAKER".

The blade shows a partial etch.

I guess that this means "SAW & TOOLS MAKER" but this does not provide much information about the name of the maker.
There is not much marking except this partial etch. The handle is showing a medallion that is quite common on this type of saws.

The handle medallion only showing Warranted Superior.

As I like this saw very much, when I found a similar one on EBay I jumped on it. That one is a 10 inches saw, also showing a partial etch with the same marking.

Same type of blade etch but brass backed.

Beyond the size, the difference is that this one is brass backed instead of steel backed. The medallion is also similar.

Same medallion.

I really would like to find out who was the maker of these two saws but to this day I was not able to find much information. I asked the sellers if they had any but they were not able to do so.

If any one has some information please send me a comment so I can solve this mystery!


Monday, April 8, 2019

When mother nature reminds you she is the boss.

Today I was supposed to finish my drawer and go onto another project. This was without considering that I am not the boss, not even in my workshop, mother nature reminded me so.
When I woke up this morning it was raining, icy rain. Few hours later it was worse then trees started to fall down, as well as power lines.
So I am back home after a day at work, thinking with great pleasure that today one drawer will be done, and I will go onto something else... then I reached home.
Power lines were down in the river, trees down on the road. I am glad I am using hand tools so no need for power, but in my basement workshop I need light!
So today was expected to be the day I can post pictures of my first drawer done once and for all, but instead it is the day mother nature reminded me something I may have forgotten: I am not in charge!

Here are some pictures to illustrate the situation.

It makes nice pictures!

On m way back from work...

...better be careful not to get that on my
wood butcher head!

My trees in the backyard... I will have some
wood for the furnace...

Thursday, April 4, 2019

Workbench drawers - Ship laping

Now that my Record 778 is setup I need to finish rabbets needed to assemble the drawer bottom. First I finished to cut the side rabbets to slide all boards between sliders and middle batten.

All side rabbets cut.
Then I cut the rabbets for the ship lap assembly. Each board has a rabbet cut from the top on one side and a rabbet cut on the bottom on the other side.

Rabbet cut from the top face.

One rabbet cut from the top, the other from the bottom.
The Record 778 is very nice to use. With the dual arms the fence does not rake at all, and after having sharpened it, it now cuts very well, I like it.
One hour later all boards have been rabbeted and ready for a dry fit.

View from drawer bottom...

... and from the inside.
I now need to bring the last board (at the top on the picture) to the correct side. Considering that I just need to remove half an inch or so I will plane the boards instead of sawing them. This will be first thing to do tomorrow. I will also plane the drawer bottom interior so very thing is well flat and I will also plane a bead between each board where they overlap to make the join nicer.

Before doing the final assembly I will apply finish on each board as it will be easier to apply if the boards are not jointed. The interior finish will consist in a coat of high grade nano penetrating polymerized protection that I elaborated after years of research in laboratory (a simple 50/50 mix of boiled linseed oil and turpentine), then a NASA approved molecular statoresistant layer of protection (a.k.a. shellac).

Stay tuned!


Wednesday, April 3, 2019

Workbench drawers - Plane issue solved, bottom assembly and new toys

After having glued the drawer sliders to the sides I needed to cut the middle batten to length before being able to start with the bottom boards.
With the middle batten in place the drawer now is ready to receive the bottom boards.

Ready to receive the bottom boards

I also need first to solve my problem with the Record #778 plane. I filed a bit the blade bed and it is better. I then looked at the blade to be sure it was perfectly flat and it is. But looking at the blade I also found out that the main issue was in the eyes of the owner...
When I sharpened the blade, I checked that the edge was square to the side... but always to the same side... that was not necessarily the right side... Checking the blade I saw that both sides are not perfectly parallel and the side I used to check the squareness of the edge was the external side of the blade, the side that stands left to the plane. But the side that makes sense is the opposite one, and when I checked the edge of course it was not square to this side. So long story short I made the edge square to this side and now everything is fine and razor sharp.

Perfect shaving from the Record 778.

Before starting to cut the rabbet on the bottom boards I did a quick check of the plane setting to be sure width and depth were adjusted to the right size. First try was right on the spot but I want to cut the rabbet a hair deeper and wider to allow for wood movement.

Right on size, but need to add a hair for wood movement.
Just a hair deeper...
... and wider.

I was ready to start with the boards. I cut 2 boards to length and did the left and right side rabbet to check how that will look.

Cutting the rabbets on the first boards.

After having cut the two first boards I was not able to resist to the temptation, I needed to do a dry fit to see the result.

Two first bottom boards in place, inside drawer view...

...and from the outside.

I like the way it looks so tomorrow I will do the lap joins and complete the same on all boards.

Today I also received some new toys.

The new toys of the day.

On the left are two gauges from Marples, at the top a combination gauge and a mortise gauge at the bottom, this last one is made of ebony. Between the two is the depth post that was missing from my Stanley 71 router plane.

From top to bottom the saws are, two Tyzack Sons & Turner (the first one older than the second), a Disston and a Footprint. While you may think the footprint has not its place among the 3 older saws, I wanted to have a Footprint in hands to try it and check the build quality, and at first sight I must say that I am nicely surprised, but this will be the subject of a separate post later.


Tuesday, April 2, 2019

Workbench drawers - Assembling pieces

Awaiting my issue with my Record 778 to be solved so to be able to start rabbeting the bottom boards I started to assemble drawer pieces.
Nothing very impressive but yesterday I glued together the front and both side.

Front and both side glued together.
Today I prepared both side sliders by sanding them so they are ready for glue up.
The sliders have little tenons on each end that go in dados cut in the front and rear boards so I added the rear board to be sure everything is well aligned.
I then glue both sliders to their respective side.

Left slider glued...
... as well as the right slider.


I need to find out why I cannot set my Record 778 blade correctly to use it for the bottom board. Hopefully I will find my way tomorrow so I can continue with this.

Monday, April 1, 2019

Vintage tools: Record 778 rabbet plane (and some problem with it)

This week I received a new rabbet plane, a Record 778 coming from England.
I already own a Craftsman 3730 made by Sargent and I like it. I used it on quite difficult wood, like the larch wood I used to make some drawer faces, and it gave good results when correctly sharpened.

Craftsman 3730 made by Sargent.

There are two main reason why I wanted to get a Record 778 , first the blade adjustment wheel, second the dual arms. With my Craftsman I noticed that I must be very careful with the fence as a single arm may allow some shift if too much pressure is applied.

The Record 778 I received.
The plane I got is not missing any part and is in quite good condition. A bit of rust here and there and the sole needs to be cleaned but nothing major.
On the format side the Record 778 is about the same size as my Craftsman and very similar, main difference being the blade adjustment and dual arms for the fence.

Craftsman 3730 and Record 778 side by side.

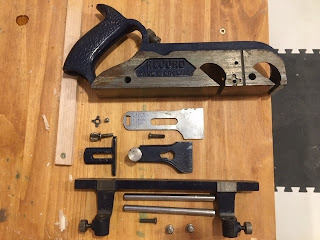
To start the cleaning process I disassembled the plane in parts.

The plane disassembled in pieces.

I started by cleaning the fence and plane body. For this I used my very high tech "machinist precision tool", a simple piece of marble on which I taped sand paper of different grits from 80 to 2000.

The precision tool.
I stroke the fence, sole and side of the plane so to remove all rust and also to flatten them.

Plane sole cleaned and flat.

I was lucky, everything was already quite flat and did not require heavy workout.

I then switched to the blade and there I found the first issue. I checked that the blade was square and here is what I found:

Not square, not even close.

No drama, back to the marble and time for some more gridding. I do not own a wheel grinder so I am getting this square by hand, should not be difficult I already did this before. After 10 minutes stroking the blade on the 80 grit sand paper I got it back to squareness. I finished the sharpening of the cutting edge increasing grit to 2000 on sand paper than I switched to water stone 4000 than 8000 and finally 3 or 4 strokes on the leather strop with buffing compound and I was done.

The little side cutter, call it a nicker, a spur or whatever, looked to have never been used so it was quite rounded and not sharp at all. To sharpen one edge I put it in the vice and used a little saw sharpening file, easy to do and this does not have to be razor sharp.

After having cleaned the body a bit and cleaned the cap iron it was time to put the blade assembly back in the plane... and there is coming my main issue. To my greatest disappointment, I have not been able to set the blade correctly. Anything I tried the blade was never straight and was protruding more on one side. I am not speaking about having the blade protruding a bit on each side of the sole as I know that this is normal and wanted. I was just not able to set the blade horizontally straight.

The blade is parallel to the mouth but still more protruding on the left.
During 30 minutes I tried to remove the cap iron, the blade, put them back, slowly tighten the cap iron etc etc... but no luck. And this made me think about how I found the blade initially, remember? The blade was not square and this was done in purpose by the previous owner to compensate for that specific problem!

Not easy to see but the blade is not straight.

As I find this is a quick and dirty way of solving that issue I removed the blade assembly and checked the blade bed, and I think to have found the issue. It looks like the bed is not straight (or maybe it is my eyes!)

This bed does not look straight to me.

The thickness at the mouth is not the same across the width.

Not sure it is visible.

So before I start to file the blade bed and mess with it, does anybody have any idea of what cause this issue? Am I on the right track thinking that this bed should be straight? If someone has any idea, advice or insight please drop me a comment!