Showing posts with label hand drill. Show all posts

Wednesday, November 18, 2020

Henry Brown brace from Sheffield

It has been a long time since my last post, but still the butcher is alive and well alive. I have been busy with some gardening work, landscaping and all sort of outdoor pleasures but now that winter is back at our door it is time to be back to woodworking.

For a long time now I wanted to get a wooden brace for the beauty of the tool but also to use it. I always found some either too expensive or in very bad shape... until recently.

I was lucky to find a very nice one, made by Henry Brown from Sheffield. I think this one was made sometime around 1810 to 1830 but not sure exactly.

Henri Brown brace.

The knob handle is solid, turn perfectly on the main body and does not wiggle. It shows only a very fine crack in the wood that looks more like a wood aging crack than coming from any abuse. This will be nothing to prevent its usage.

Medaillon on the knob,
Henry Brown from Sheffield.

The brace mouth is very clean, the square is almost perfect and does not show any damage nor much wear.

The brace mouth in very good shape.

The mechanism to release the bit is also working nicely, I just oiled it a bit so to make it smooth. On this brace, instead of a push button, there is a small lever that push the spring holding the bit.

The bit release mechanism.

The bit is tight in the mouth and have no room to wiggle.

Brace bit tight in the brace mouth.

Now that I have the brace I was looking for, I need to clean my bits collection so to get them shining. I have a bunch of them so it took me few hours to give them all a good Evaporust bath. While they were bathing I took the opportunity to make an holder so they won't just lay in a plastic box and be forgotten.

The brace and my bits set.

These bits are all in usable state and sharp and I tried every one of them. However I guess that some will be used more often than others. I doubt I will use the reamers very often.


Thursday, August 6, 2020

The strangest brace I ever saw

I just went over the strangest brace I ever saw and thought this one was worth a post, so here it is:

A strange brace.


It looks like a mutant born from a brace breeding with a hand drill and apparently can be both. If one is interested it is currently for sale on EBay.


Tuesday, December 24, 2019

Santa passed by

Today I met with Santa. As I have been a very good boy this year he brought me a lot of little candies. Let start with the list.

First a Marples & Sons spokeshave and a dovetail saw. I am wondering if the spokeshave was ever used looking at it. The saw needs a sharpening touch up but does look good too.

Marples & Sons spokeshave and dovetail saw.

Second, a Millers Falls #10 plane. This is the equivalent of a Stanley 41/2. I wanted one so much but was not able to find one at a decent price. These are pretty rare on the market and usually the price is quite high, add to that the shipping fees and it will cost you a leg. This one looks to be a type 2 (more to come about it).

Millers Falls #10

As I plan to make some tools that will require some wood screw, I got a tap and die set to make wood screw. This one is for a 3/4 screw. These were also sold in set from 1/2 to 1"1/2 but I wanted to check the quality first. I did not try it yet but it looks to be well built.

Tap and die set for 3/4" wood screw.

Next, a small bow saw by Marples & Sons in very good shape, no crack and the blade is still sharp.

Marples & Sons bow saw.

Now a true jewel. This is a full set of Russel Jennings bits in perfect condition, even the box is not damaged and still have all the hardware. Again these are usually in a very high price range and the shipping cost is prohibitive but I found this one not far from me and at a very good price. It was a kind of guess as I was wondering if at that price the bits would have been damaged but the surprise was great when I saw there are all in perfect shape.


Next, a very nice little level by Marples & Sons (Do I seem to like that manufacturer very much?). Very nice and more pleasure to use this than my usual plastic level.


And finally the cherry, something that I wanted for the pleasure to handle one as I never got that luck before and I find it very funny, a Millers Falls 502B corner brace. Not sure I will use it a lot but I think this is a very funny tool.

Millers Falls 502B corner brace

Now that Santa brought me so many things I must go back to work and finish my TV stand project as I am already late!

Merry Christmas to you all!

Tuesday, October 29, 2019

Hand drills support

After thinking about my hand drills support mentioned in my previous post, I again changed my mind. It looks like changing plan is a tradition for me.
I think it will be better looking if the support is of same size of the previous one, and as I do not need the same space to store the 3 drills I own, I will add 2 shelves at the bottom so to store my drill bits.
The plan is now to get something like this:

The new plan.

As usually the first step was to cut all pieces to length using the miter box, some sawing fun.

I love to play with this miter box.

The needed material is a 16"x32" pine board to be used as the back, three 1"x6"x4' boards to be used for the shelves and sides. and a scrap piece of 1"x4" that will form the hanging support.

The pieces cut to length.

Now that the pieces were cut I had to tackle the two lower shelves. These two will be notched to encompass the back board. First, I marked the board.

One of the shelf marked for cut.

To cut the notch I used a backsaw to do parallel cut into the waste.

Using a backsaw to cut the waste.

This saw was made by Footprint. When I got it I was expecting a cheaply made saw but was very surprised and I really love it. I find it well balanced and the tote is of perfect size for my hand.

The waste cut like a comb.

Next I used a chisel to chop out the teeth of the waste comb.

Choping the waste.

I then cleaned the remaining chunks to get the final result.

One shelf done.

Repeat the same for the second shelf and I got a pair of shelves ready to be fitted.

A pair of shelves.

Next step was to tackle the drills handing support. For this I cut 3 notches in the 1"x4" board. After marking the notches location, I started to drill a hole using a brace then I cut each side with the backsaw.

Drilled and cut on one side...

...waste removed, remains to clean the cut.

After a bit of cleanup with a sharp chisel and two more notches, the support is done ready to be fitted.

Support to hand the drills.

For the side the process was the same as for the previous support, I marked the boards, cut the waste with a coping saw and carved the curves using my spokeshaves. I then assembled the top shelf, the below support and the two sides using glue and dowels.


Top shelf, support and two sides assembled.

I then assembled the two lower shelves, again with glue and dowels.

Gluing bottom shelves.

After choping the dowels dead flat and planing sides with a smoother the support is ready for a coat of linseed oil and turpentine. Below is the result.

The support after one cor of oil.

I will wait a day and will give it some coat of blonde shellac like the previous one and fixed it on the wall.


Thursday, October 17, 2019

Hand brace wall support

After some other things to tackle related to our boat, three weeks of vacation in the beautiful Nova Scotia, and going through an hurricane there, here I am finally back to some woodworking.
First thing I did was to finish my workbench extension so to have a bit more space to occupy (or to mess with).

My last workbench extension.

I now need a support on the wall to hang my hand braces. I have 5 of them and I want to get them properly stored and easily reachable. So back to the drawing board I came up with this plan:

The current plan, front view at the top,
each side view at the bottom.

I will build this from some unused pine boards I already have. The back board will be made from a 16"x36" laminated board, top and side will be pine 1"x6". Top and side will be assembled using dovetails and the assembly will be pegged to the back board. This will be a good opportunity to try myself to dovetails for the first time. Brace supports will be length of 7/16" peg.

My brace set.

First thing is to ensure that I will drill straight, so I need to build a guide to help drilling holes in the back board. I have a Stanley #59 doweling jig but I cannot use it on a board as is as it is intended to be set on a beam and not on a board. I will use a piece of scrap wood marked with center lines on both axis onto which will come the doweling jig. The piece of wood will be drilled through and will be clamped on the back board.


Stanley #59 doweling jig and the needed material:
a piece of scrap wood and a cold one

After having checked that the piece of wood is perfectly straight and square, I carefully marked center lines.

Center line carefully marked.

I then set the jig onto the piece of wood at the cross point then drilled a hole with a hand brace.

The jig set right on the cross mark...
... this will allow me to drill straight
 on the board. 


I marked the board with crossing lines where the holes for the dowels will be drilled so to set the jig right on spot.

Cross marks on the board to center the jig.

The jig is simply held in place using a C clamp and set in order to align lines on the board and lines on the jig.

...ready to drill
The jig in place for the first hole...
It did not take long to have the 10 holes done.

Holes drilled and ready to receive their piece of peg.

Next step is to take care of the needed pegs. I cut 10 length of 4"3/4.

10 pegs, each 4"3/4 long.

I then beveled each dowel end that will go through the board and rounded the other. I used a convenient tool for this, a simple pencil sharpener.

Using a pencil sharpener to bevel one end of each dowel.
Lastly I glued each dowel on the board and ensured they all are at the same depth using a depth gauge.

Checking dowel depth.
The dowels glued on the back board.
I will next tackle the shelf that will go on top of the board.


Monday, August 19, 2019

Vintage tools: Millers Falls No2 hand drill.

A while ago I found a Millers Falls No2 hand drill for a cheap price on EBay so I jumped on it. For few months it was just sitting on a shelve waiting for me to wake up. The drill is in correct condition but the handle shows some dirty green paint, maybe the previous owner used it to blend his paint stock, who knows!

Can you spot the green paint on the cap?
That flowed all over the handle

I started by disassembling the drill in pieces so to clean and lubricate gears and to restore the handles.

The main wheel is in good shape, teeth are not showing any wear, just some grease gunk.

The main wheel is in good shape.

I sanded the handles so to remove that ugly green paint. I am not sure what wood has been used but there was a reddish stain below the green paint and varnish.

One handle sanded.

After cleaning handles from dust I gave them a coat of red mahogany stain.

Handles after a coat of red mahogany stain.

Following the stain I applied 5 coats of amber shellac as a finish.

The handles after their 5th and last coat of amber shellac.

After having oiled properly all gears and bearing I put everything back together.

The final result.

Now, restoration purists and tools lovers, stop reading further as what follows may hurt your feelings.

When I started that restoration I found out that the main handle was loose. The handle was retained to the drill body by a pin, and after different tries I have been unable to remove that pin without risking to damage the handle but I needed to make that handle firm on the body. To do this I used a big hydraulic crimping tool, that I normally use while making battery cable to crimp cable lugs. I selected a pair of jaws that were just a tid smaller than the handle metal ring and I crimped the handle on the drill body. While not a conventional way of doing it this perfectly made the trick and the handle is now firm to the body.

The handle crimped on the body.

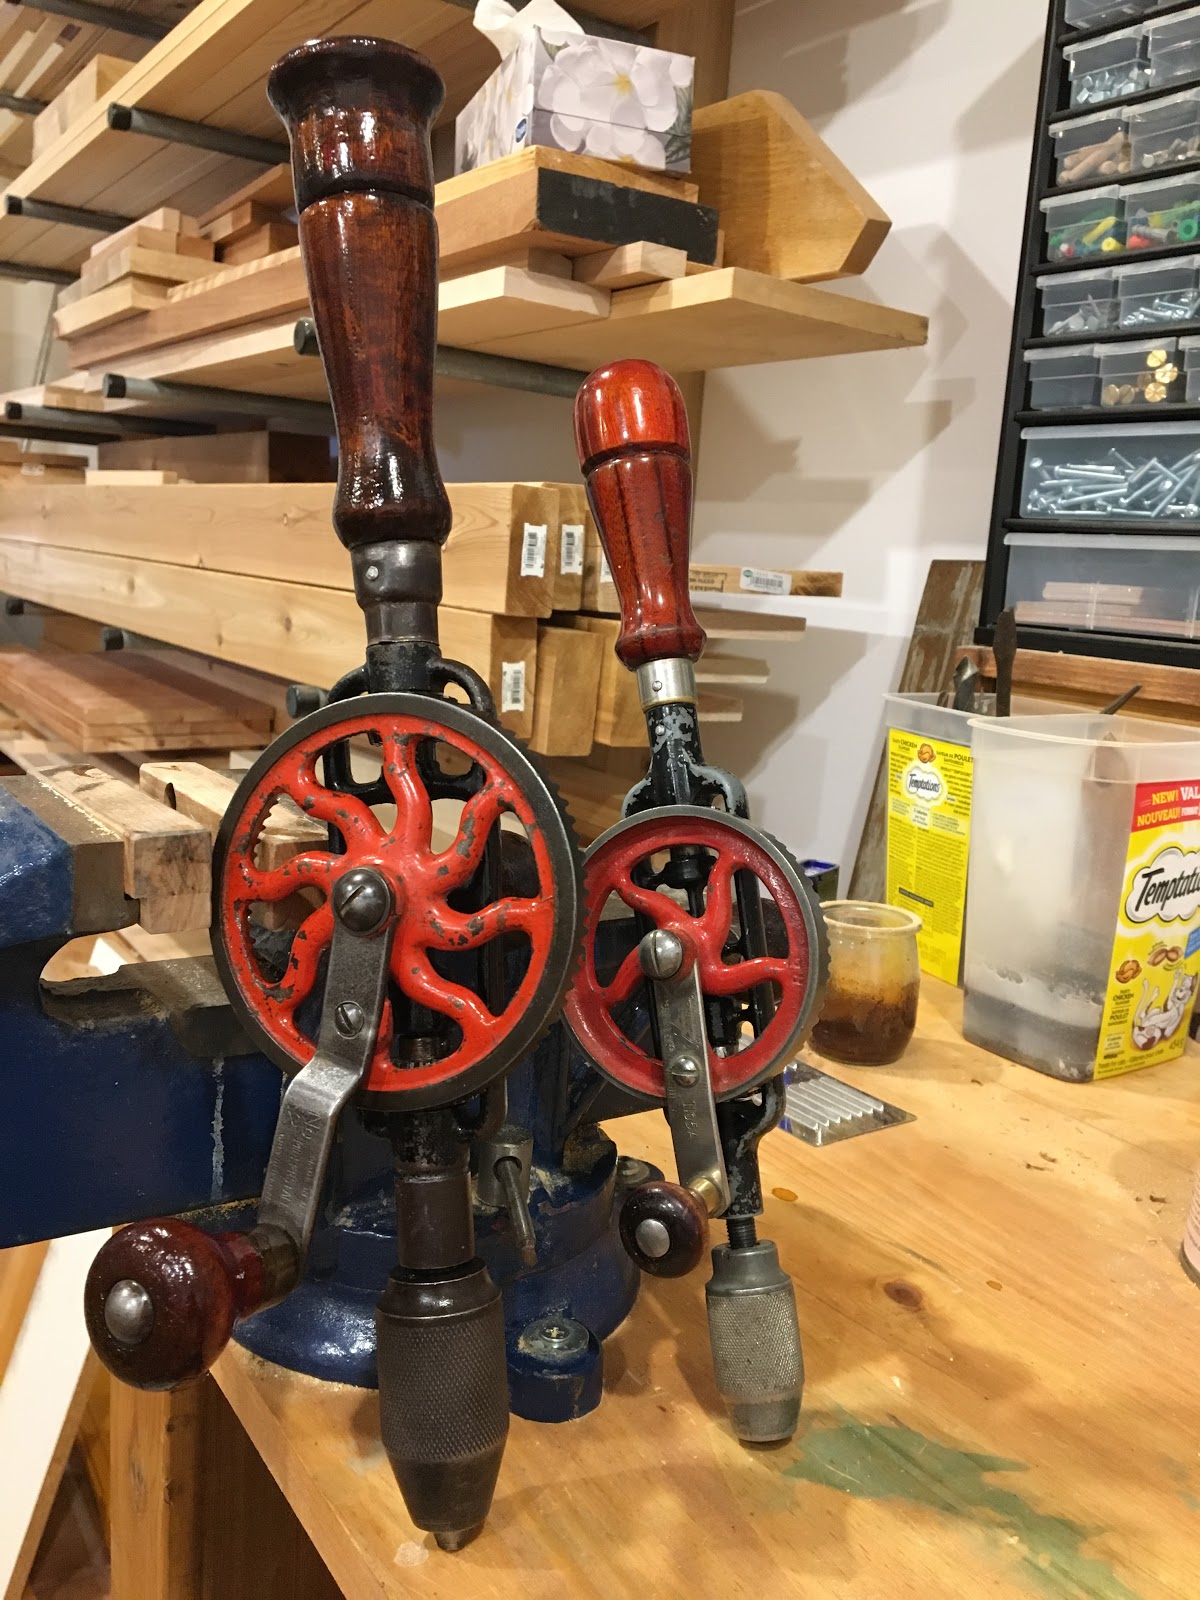
This is a very nice drill and I already like it very much. It will join my No 5 in the workshop.

No 2 and its little sister No 5 altogether.