Wednesday, October 30, 2019

Stanley #12 rehab

Waiting for the coat of linseed oil to dry on my hand drill support, I got the time to look at a Stanley #12 cabinet scrapper plane that I got a while ago. I got this one more than 6 months ago but never got a chance to clean it and put it back to work.

First I took it apart to check that no part was broken or unusable.

The Stanley #12 in pieces.

The sole and side were quite oxidized but were showing no damage or excessive rust so I started by cleaning the sole and ensuring it was flat.

Marked the sole with a sharpie before some scrubbing
 on sand paper.

After few strokes the sole was clean and flat enough.

A clean sole.

I applied the same to each side of the plane.

First side...
...second side, all clean.


I then did further cleaning using polishing paste and compound so to remove all and any remaining iron dust.

A shiny sole...
... and a shiny side.


The japanning was in good condition, almost no sign of wear, but was quite dirty so I cleaned it using the same polishing paste.

Quite dirty indeed... Looks that this plane has seen
some real woodworking.

I used the same to clean and polish the brass wheels that were not really looking like brass anymore.

Shiny brass wheel.

The handle was in perfect shape, just dirty so I cleaned it and I had no need to refinish it. With time it got a patina that I really want to keep like it is.

All pieces back together.

That plane did not come with a blade, or more exactly it was coming with a blade that was not really what I would call a blade, so I got this from LV:

A brand new LV blade.

The new blade comes already ground to 45 degree...

The blade is already ground.

... and it fit perfectly in the #12.

The new blade fit perfectly.

I think this will be a very nice plane and I am impatient to try it, but before being able to put it back to work I need to be able to sharpened that blade properly, thing that I never did before. So this will be part of another story boys.

Some more plane porn.


Tuesday, October 29, 2019

Hand drills support

After thinking about my hand drills support mentioned in my previous post, I again changed my mind. It looks like changing plan is a tradition for me.
I think it will be better looking if the support is of same size of the previous one, and as I do not need the same space to store the 3 drills I own, I will add 2 shelves at the bottom so to store my drill bits.
The plan is now to get something like this:

The new plan.

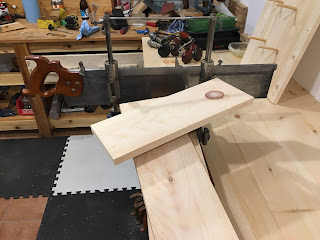
As usually the first step was to cut all pieces to length using the miter box, some sawing fun.

I love to play with this miter box.

The needed material is a 16"x32" pine board to be used as the back, three 1"x6"x4' boards to be used for the shelves and sides. and a scrap piece of 1"x4" that will form the hanging support.

The pieces cut to length.

Now that the pieces were cut I had to tackle the two lower shelves. These two will be notched to encompass the back board. First, I marked the board.

One of the shelf marked for cut.

To cut the notch I used a backsaw to do parallel cut into the waste.

Using a backsaw to cut the waste.

This saw was made by Footprint. When I got it I was expecting a cheaply made saw but was very surprised and I really love it. I find it well balanced and the tote is of perfect size for my hand.

The waste cut like a comb.

Next I used a chisel to chop out the teeth of the waste comb.

Choping the waste.

I then cleaned the remaining chunks to get the final result.

One shelf done.

Repeat the same for the second shelf and I got a pair of shelves ready to be fitted.

A pair of shelves.

Next step was to tackle the drills handing support. For this I cut 3 notches in the 1"x4" board. After marking the notches location, I started to drill a hole using a brace then I cut each side with the backsaw.

Drilled and cut on one side...

...waste removed, remains to clean the cut.

After a bit of cleanup with a sharp chisel and two more notches, the support is done ready to be fitted.

Support to hand the drills.

For the side the process was the same as for the previous support, I marked the boards, cut the waste with a coping saw and carved the curves using my spokeshaves. I then assembled the top shelf, the below support and the two sides using glue and dowels.


Top shelf, support and two sides assembled.

I then assembled the two lower shelves, again with glue and dowels.

Gluing bottom shelves.

After choping the dowels dead flat and planing sides with a smoother the support is ready for a coat of linseed oil and turpentine. Below is the result.

The support after one cor of oil.

I will wait a day and will give it some coat of blonde shellac like the previous one and fixed it on the wall.


Wednesday, October 23, 2019

Onto the next project.

Since my previous post, the last thing remaining to be done for my brace support was to apply the last coats of shellac. This is what I did yesterday and now that everything dried out it was time to install it. Here is the final result.

Front view...
...side view


Now that I can call this done it is time to jump onto the next project, and it will be a similar one. I need to make a wall hanging support for these babies.

My hand drill set.

So I will make a support with a similar design as the previous one, just smaller, and with a different way to hang the drills. This time the top shelf will have 3 notches for the drills to fit in.

The plan as of today.


Monday, October 21, 2019

Almost done.

In my previous post I mentioned that I changed my mind about the design for the sides of the wall support and that these will be pegged on to the back board. So I carefully marked the holes location on each side and started to drill, but this time I did it by hand without a jig. I must admit that it was easier and quicker to do without the need to set the jig for each hole.

Peg holes drilled on each side.

I prepared a bunch of 5/16" dowels, cut to length and beveled using my pencil sharpener again.

A bunch of dowels to use for the sides assembly.

Then it was mostly a matter of drilling holes in the back board using the matching side hole as a guide, and gluing everything together.

First side assembly, please forgive the miserably cheap clamps,
 but for now this is all I got.

Waiting for the glue to set, I had time to practice my saw sharpening skills. This time I choose to sharpen a Taylor Brothers tenon saw.

The second saw I sharpened in my life of wood butchering.

This saw is a pretty heavy one with its brass back but the handle is well shaped to my hand. I cleaned the blade a bit using polishing paste and I did sharpen it. It took me something like 30 minutes to do. I will need to add more set to the teeth as the blade has a tendency to be stuck in the wood while cutting.

Taylor Brother etch is one of the nicest I ever saw.

For sharpening I am using a guide for fleam and rake made by Veritas. I must admit that it is a bit of a disappointment. Even when tightly set it has the bad tendency to loosen and to lost its setting what is not very enjoyable when you are in the middle of a file stroke.

Back to the brace support, after the glue has dried and the clamps were removed I took a look of the result.

First side assembly done awaiting cleanup.

It was time for the second side assembly so I followed the same steps.

Second side assembly

When the glue had set it was time for a bit of cleanup. I chopped the dowels flat using a chisel then planed a bit the sides. I then chamfered all angles with my little big plane, a Craftsman 3905 hobby plane.

Chisel and tiny plane at work to chamfer all angles.

I really love this plane and it is one that I used very often, either for bevel/chamfer or on end grain it is a pleasure to use.

After some light sanding the support is ready to receive its finish.

Ready for finishing.

Note to self: remember to remove pencil marks BEFORE final assembly as it is a PIA to remove them afterward.

I am first applying a mix of turpentine/linseed oil as a base coat, I like the way it enhance the "golden" aspect of the pine. When it will have dried out I will apply 3 coats of blonde shellac and will call it done.

A coat of turpentine/linseed oil mix improve the
golden aspect of the pine.

Friday, October 18, 2019

Changed my mind... Again!

Yesterday while continuing with my hand brace wall support and looking at the plan I came up with I changed my mind regarding the design of the side and top shelf. The updated plan is shown below.

On the left, the new design of the side and top shelf.

The side will go over the shelf and will be convexly rounded a the top and concavely at the bottom. This looks more pleasant to my eyes that way. As a consequence I will play with dovetails later as the assembly now will be made all the way with dowels.

I cut the needed piece using my venerable the miter box. Here the length of the shelf is of importance but the length of the vertical sides is not, provided that they are of same length. So I cut the shelf to the exact length and cut the remaining of the board in two pieces.

All 3 pieces cut on the venerable miter box.

Next is to mark the rounded ends. For this I used a divider with sharp tips to make a faint mark on the wood that I then highlighted with a pencil.

On the left, one side marked.

Here I am only marking one side that I will cut and then use as a template for the other side.
I removed most of the waste using a coping saw and used my set of spokeshaves to plane to the marked line. I got this spokeshaves set (flat sole and rounded sole) for a good price and this is the first time I use them. After 10 minutes of sharpening they were very nice to use.

Using the flat sole spokeshave for the convexly
rounded end...

...and the rounded sole spokeshave for the
concavely rounded end.

When the first side was done I used it as a template to mark the other side.

Using the first side as a template for the second.

When the second side was done I clamped both of them side by side and used the spokeshaves to ensure the rounded ends were exactly the same.

Planning both boards clamped side by side to
make the rounded ends identical.

When finished this is how it will looks like.

Dry fit, looks good to me.

Stay tuned for the final assembly!