Showing posts with label tools. Show all posts

Monday, December 19, 2022

On Pencil Sharpeners

I am a great fan of pencils. I love to use them for marking but also to write and take note. The only thing that always annoyed me is pencil sharpeners.

I always found very hard to get a good sharpener that can last more than few months without becoming dull and more crushing the pencil than really sharpening it.

The following are some examples of sharpeners I used.

Some sharpeners.

All of these had common issue, they are ok when brand new, but the blade becomes quickly dull, and sharpening it is cumbersome and does not last long.

But today, I got my dream sharpener, one I saw long time ago when I was a kid at school.

My dream sharpener.

It cost me about 20$ but this one is incredibly good. It sharpened pencil very quickly and accurately, and is easy to use. It has a transparent shavings tray that can collect a lot of shavings so no need to empty it often.

Shavings tray.

It has a point selector to choose from very fine to rounder point. Personally I only use the finest setting.

Sharpening selector
The front has a slider to push the pencil toward the sharpening blades and to stop sharpening when limit is reached. The lever is used to open the pencil holder.

The two levers are used to open pencil holder.

Pencil holder in extended position.

I spend few time to play with it and I really enjoy it, from now on this will be my sharpener of choice.

Sharpened pencils


Friday, March 4, 2022

Stanley #113 Circular Plane

Quite some time flew since my last post. Never would I have believed how much busy I could be while working from home. I have more personal time but find many ways to keep me busy so at the end I need even more time!
I have always been interested about circular planes and never had a chance to try one...well until now.
Few days ago I was lucky to find one in almost perfect condition for a very reasonable price so I pulled the trigger on it.

Stanley #113


This is a Stanley #113 type 4a dated back to 1903. Except some missing japanning it is in perfect working condition.

Scale for curvature

The interlocking gears are showing a numeric scale from 0 to 3 in each directions. However I have not been able to find the meaning of the numbers if there is any.
I love the dovetail assembly of the body and sole and on this one it is tight. I saw a lot of these planes with this assembly being loose.

Stanley Rule & Level Co.

The knob used to set the sole curvature is labelled with "Stanley Rule & Level Co.".

Dovetail riveted to sole.

The dovetail pin is riveted to the sole and the rivets are ground flat to the sole. No damage there either.

I did not resist very long to give it a try so I took a scrap wood piece and tried it. I was expecting it to be quite difficult to handle but to my surprise it is not. Set the curvature, then start on one side of the curve than on the other side and done.

A planed curve.

I now need to put it at work, I am sure I will have soon a project where I will need some curved design, just to enjoy it.


Thursday, March 25, 2021

On the tools...

I am from the ones who think that what we are now or at a given time is the sum of our past experiences, choices we made and people we met. The reason why I like woodworking is maybe the result of people I had the chance to meet before, who influenced my life, like my great grandfather who was a sawyer and carpenter.

Some 25 years ago, while doing some volunteering in a museum in France, I met a wood carver who was invited to that museum for a cultural exhibition. The name of that person was Norbu-la and he was coming from a Tibetan refugee village in Dharamsala in north India. The goal of that exhibition was to showcase art of wood carving in Tibetan culture by carving a Tibetan altar made of teak.

Norbu-la, Tibetan carver in front of his teak altar

During his stay I had the opportunity to spend quite some time with him and to learn about how he was working and to give it a try.


Example of the carver skills...
...and of mine!


This was also an opportunity to look at the tools he was using, especially that these were mostly homemade.


The carver tools, squares, saw, chisels, marking gauge.

Among these tools some are particular to notice.

First of all, the coping saw. That saw was made with a piece of bamboo, shaped into a U form. Bamboo being very flexible it was keeping the tension on the blade like a spring, very clever. 

The saw blade itself was very particular. It was made using a steel wire reclaimed from old tires inner reinforcement wires. The steel was quite mild but still very resistant. The wire was rolled on one side of the bamboo frame, serving as a reserve, and attached at the other end. Before being usable, the carver was cutting very small teeth in the wire using chisel and mallet. When the blade was broking, he would just unroll a new piece, cut the teeth and back to work.

Surprisingly that saw was cutting very well even in hard wood and was very nice and easy to use. The bamboo frame being very well balanced and the saw was easy to handle.

Other tools to notice were the carving chisels. A lot of them, the smallest ones, were made from motorbike wheel spokes. From what he told me the steel used for spokes is a very good quality steel that can handle a heavy tension. They used the spokes as the raw material that was forged into the final chisel. I can assure that these chisels were razor-sharp, my finger will never forget how easily it was to deep cut it.

To sharpen these chisels, the carver was using a black stone, that he carefully selected in the bed of a river and broke in two pieces to have a flat face. I do not know what kind of stone it was but it was very soft to touch and had a fine abrasive grain. He poured water on the stone and honed a chisel for a minute and he was done. 

So looking at the quality of his work, and the simple tools he was using, one question comes to my mind:

Are the tools making the man, or the man who makes the tools?

Tuesday, December 29, 2020

Anatomy of a Peugeot plane

Few days ago, I received an email from Simon living in Netherlands about the dimensions of one of my Peugeot plane. Simon got a Peugeot blade assembly and wants to build the plane that goes along. So I made some pictures and drawings with measurements and here is the anatomy of a Peugeot plane.

Introduction


Peugeot 48


The plane is a Peugeot 48 (what is also the blade width measured in mm) and is made with Cormier wood (French naming) or Service Tree in English. For the naturalists, its scientific name is Sorbus Domestica.

Its length is about 93/8 inches (or about 238mm) what makes it a smoother plane.

Its particularity is the mechanism to move the blade.

Blade assembly, top view
Blade assembly, side view


I tried to be as precise as possible in my measurements, in inches as well as millimeters, but there may be some small deviations.

Side view

The picture below shows the side view of the plane wooden body (blade assembly and wedge removed).

Plane body, side view.

Below is a drawing with all the dimensions I was able to measure.

Plane body side dimensions.

One thing that surprised me is the 80 degrees angle of the front side of the mouth that I believed was vertical but is not.

Top view

Below is a picture of the plane body top view.


Plane body, top view

Note the notch in the blade bed that receives the adjustment screw mechanism.
Below are the corresponding dimensions on a drawing.

Plane body top dimensions

About the wedge

Below are two pictures of the plane wedge. Sorry for the shadow but I have no professional studio light so this as the best I could do.

Wedge, top view
Wedge, side view


Finally below is a drawing of the same views with the corresponding dimensions.

Wedge dimensions

Hope this will help, and if anybody is making a clone of it, please send me a picture.

Wednesday, November 18, 2020

Henry Brown brace from Sheffield

It has been a long time since my last post, but still the butcher is alive and well alive. I have been busy with some gardening work, landscaping and all sort of outdoor pleasures but now that winter is back at our door it is time to be back to woodworking.

For a long time now I wanted to get a wooden brace for the beauty of the tool but also to use it. I always found some either too expensive or in very bad shape... until recently.

I was lucky to find a very nice one, made by Henry Brown from Sheffield. I think this one was made sometime around 1810 to 1830 but not sure exactly.

Henri Brown brace.

The knob handle is solid, turn perfectly on the main body and does not wiggle. It shows only a very fine crack in the wood that looks more like a wood aging crack than coming from any abuse. This will be nothing to prevent its usage.

Medaillon on the knob,
Henry Brown from Sheffield.

The brace mouth is very clean, the square is almost perfect and does not show any damage nor much wear.

The brace mouth in very good shape.

The mechanism to release the bit is also working nicely, I just oiled it a bit so to make it smooth. On this brace, instead of a push button, there is a small lever that push the spring holding the bit.

The bit release mechanism.

The bit is tight in the mouth and have no room to wiggle.

Brace bit tight in the brace mouth.

Now that I have the brace I was looking for, I need to clean my bits collection so to get them shining. I have a bunch of them so it took me few hours to give them all a good Evaporust bath. While they were bathing I took the opportunity to make an holder so they won't just lay in a plastic box and be forgotten.

The brace and my bits set.

These bits are all in usable state and sharp and I tried every one of them. However I guess that some will be used more often than others. I doubt I will use the reamers very often.


Thursday, August 6, 2020

The strangest brace I ever saw

I just went over the strangest brace I ever saw and thought this one was worth a post, so here it is:

A strange brace.


It looks like a mutant born from a brace breeding with a hand drill and apparently can be both. If one is interested it is currently for sale on EBay.


Monday, April 27, 2020

Big slab planing and a drama (sort of).

Long time since my last post. We just came out from 3 weeks of vacation (at home of course) that we spent doing some long due home renovations.
Still I took the opportunity of the nice weather coming back to start planing some big slabs of white pine to prepare them for the bench I want to build. It is a joy to plane outside under a shining sun!

Start planing the slabs.

This was also the opportunity to play with the latest tool I got, a Millers Falls #88 jointer plane fence. I got it in perfect shape, it just needed a bit of cleaning and was ready to be back to work.
I mount it on my Stanley #7 and used it for the first time. At first it was a bit strange to use but when I got used to it I found it nice. With this, it is easy to follow a long straight edge.


Trying my Millers Falls #88 jointer fence.

After a while, and a bunch of shavings, it was time to clean up the deck a bit.

Time for a good sweep to collect the shavings.

And then came the drama... My Stanley #7 was resting peacefully on the slab when I heard a big "bang"... the plane felt down on the deck. The result was immediate:

Resulting effect of a fall.

I was lucky enough that my deck was made in wood so the shock was not too hard on the plane sole and the only damage was a broken tote and a slightly bent threaded rod.
It was easy to get the rod back straight. For the tote I used epoxy to glue it back in one piece.

Tote glued back in one piece.

After slight sanding and a coat of finish, it will be almost as new.

Anyway, lesson learned: When the job is done, put the plane back to its shelf!


Tuesday, February 25, 2020

Addition to my shop

After having finished my last project I decided to build some additional shelves for my shop. I was fed up to see all my planes taking my workbench space so it was time to sort that out. 
I built this on the same design as my other shelves for my braces and hand drills. Unfortunately I did not think about taking much pictures about the construction.


Gluing up the last pieces

For this one I added some support that will rest on the workbench below. The shelf itself is quite heavy but with the addition of all the plane weight I thought it was preferable to have this resting of some surface instead of putting all the strength on the wall, even if screwed in the inner studs.

At the end this is the final result.

Final setup.
Close-up
The shelves are built around my screen and this is where vintage classic tools meet with technology. I find a screen to be a very convenient tool to display a schema or plan of your project. It is easy to take a take a picture of your plan  with your phone if you draw it on paper, share your phone screen to the TV screen and you have a big size display board.

Now onto my net project. I need to build a bathroom vanity for my master bedroom. For this I came up with something that will schematically look like that:

First draft
The top will receive the vessel sink and faucet. Pretty simple and straightforward looking but this is the kind of design I like the most.
The sink is ordered and I will wait to receive it before starting any more detailed plan so to check for correct sizing. 


Tuesday, December 24, 2019

Santa passed by

Today I met with Santa. As I have been a very good boy this year he brought me a lot of little candies. Let start with the list.

First a Marples & Sons spokeshave and a dovetail saw. I am wondering if the spokeshave was ever used looking at it. The saw needs a sharpening touch up but does look good too.

Marples & Sons spokeshave and dovetail saw.

Second, a Millers Falls #10 plane. This is the equivalent of a Stanley 41/2. I wanted one so much but was not able to find one at a decent price. These are pretty rare on the market and usually the price is quite high, add to that the shipping fees and it will cost you a leg. This one looks to be a type 2 (more to come about it).

Millers Falls #10

As I plan to make some tools that will require some wood screw, I got a tap and die set to make wood screw. This one is for a 3/4 screw. These were also sold in set from 1/2 to 1"1/2 but I wanted to check the quality first. I did not try it yet but it looks to be well built.

Tap and die set for 3/4" wood screw.

Next, a small bow saw by Marples & Sons in very good shape, no crack and the blade is still sharp.

Marples & Sons bow saw.

Now a true jewel. This is a full set of Russel Jennings bits in perfect condition, even the box is not damaged and still have all the hardware. Again these are usually in a very high price range and the shipping cost is prohibitive but I found this one not far from me and at a very good price. It was a kind of guess as I was wondering if at that price the bits would have been damaged but the surprise was great when I saw there are all in perfect shape.


Next, a very nice little level by Marples & Sons (Do I seem to like that manufacturer very much?). Very nice and more pleasure to use this than my usual plastic level.


And finally the cherry, something that I wanted for the pleasure to handle one as I never got that luck before and I find it very funny, a Millers Falls 502B corner brace. Not sure I will use it a lot but I think this is a very funny tool.

Millers Falls 502B corner brace

Now that Santa brought me so many things I must go back to work and finish my TV stand project as I am already late!

Merry Christmas to you all!

Monday, December 2, 2019

Peugeot Freres Plane

A while ago my father brought me a Peugeot Freres plane from France that I did not restored yet, well until this last weekend.

Peugeot Freres plane.

This plane is made of Cormier wood (Sorbus Domestica) and it is stamped on the plane. From the stamp on one side of the plane this is a 48mm plane.

Peugeot Freres stamp on the plane nose with 48 indicating
the width in mm.

The plane sole is in perfect shape.

The sole has no damage and is straight and flat.

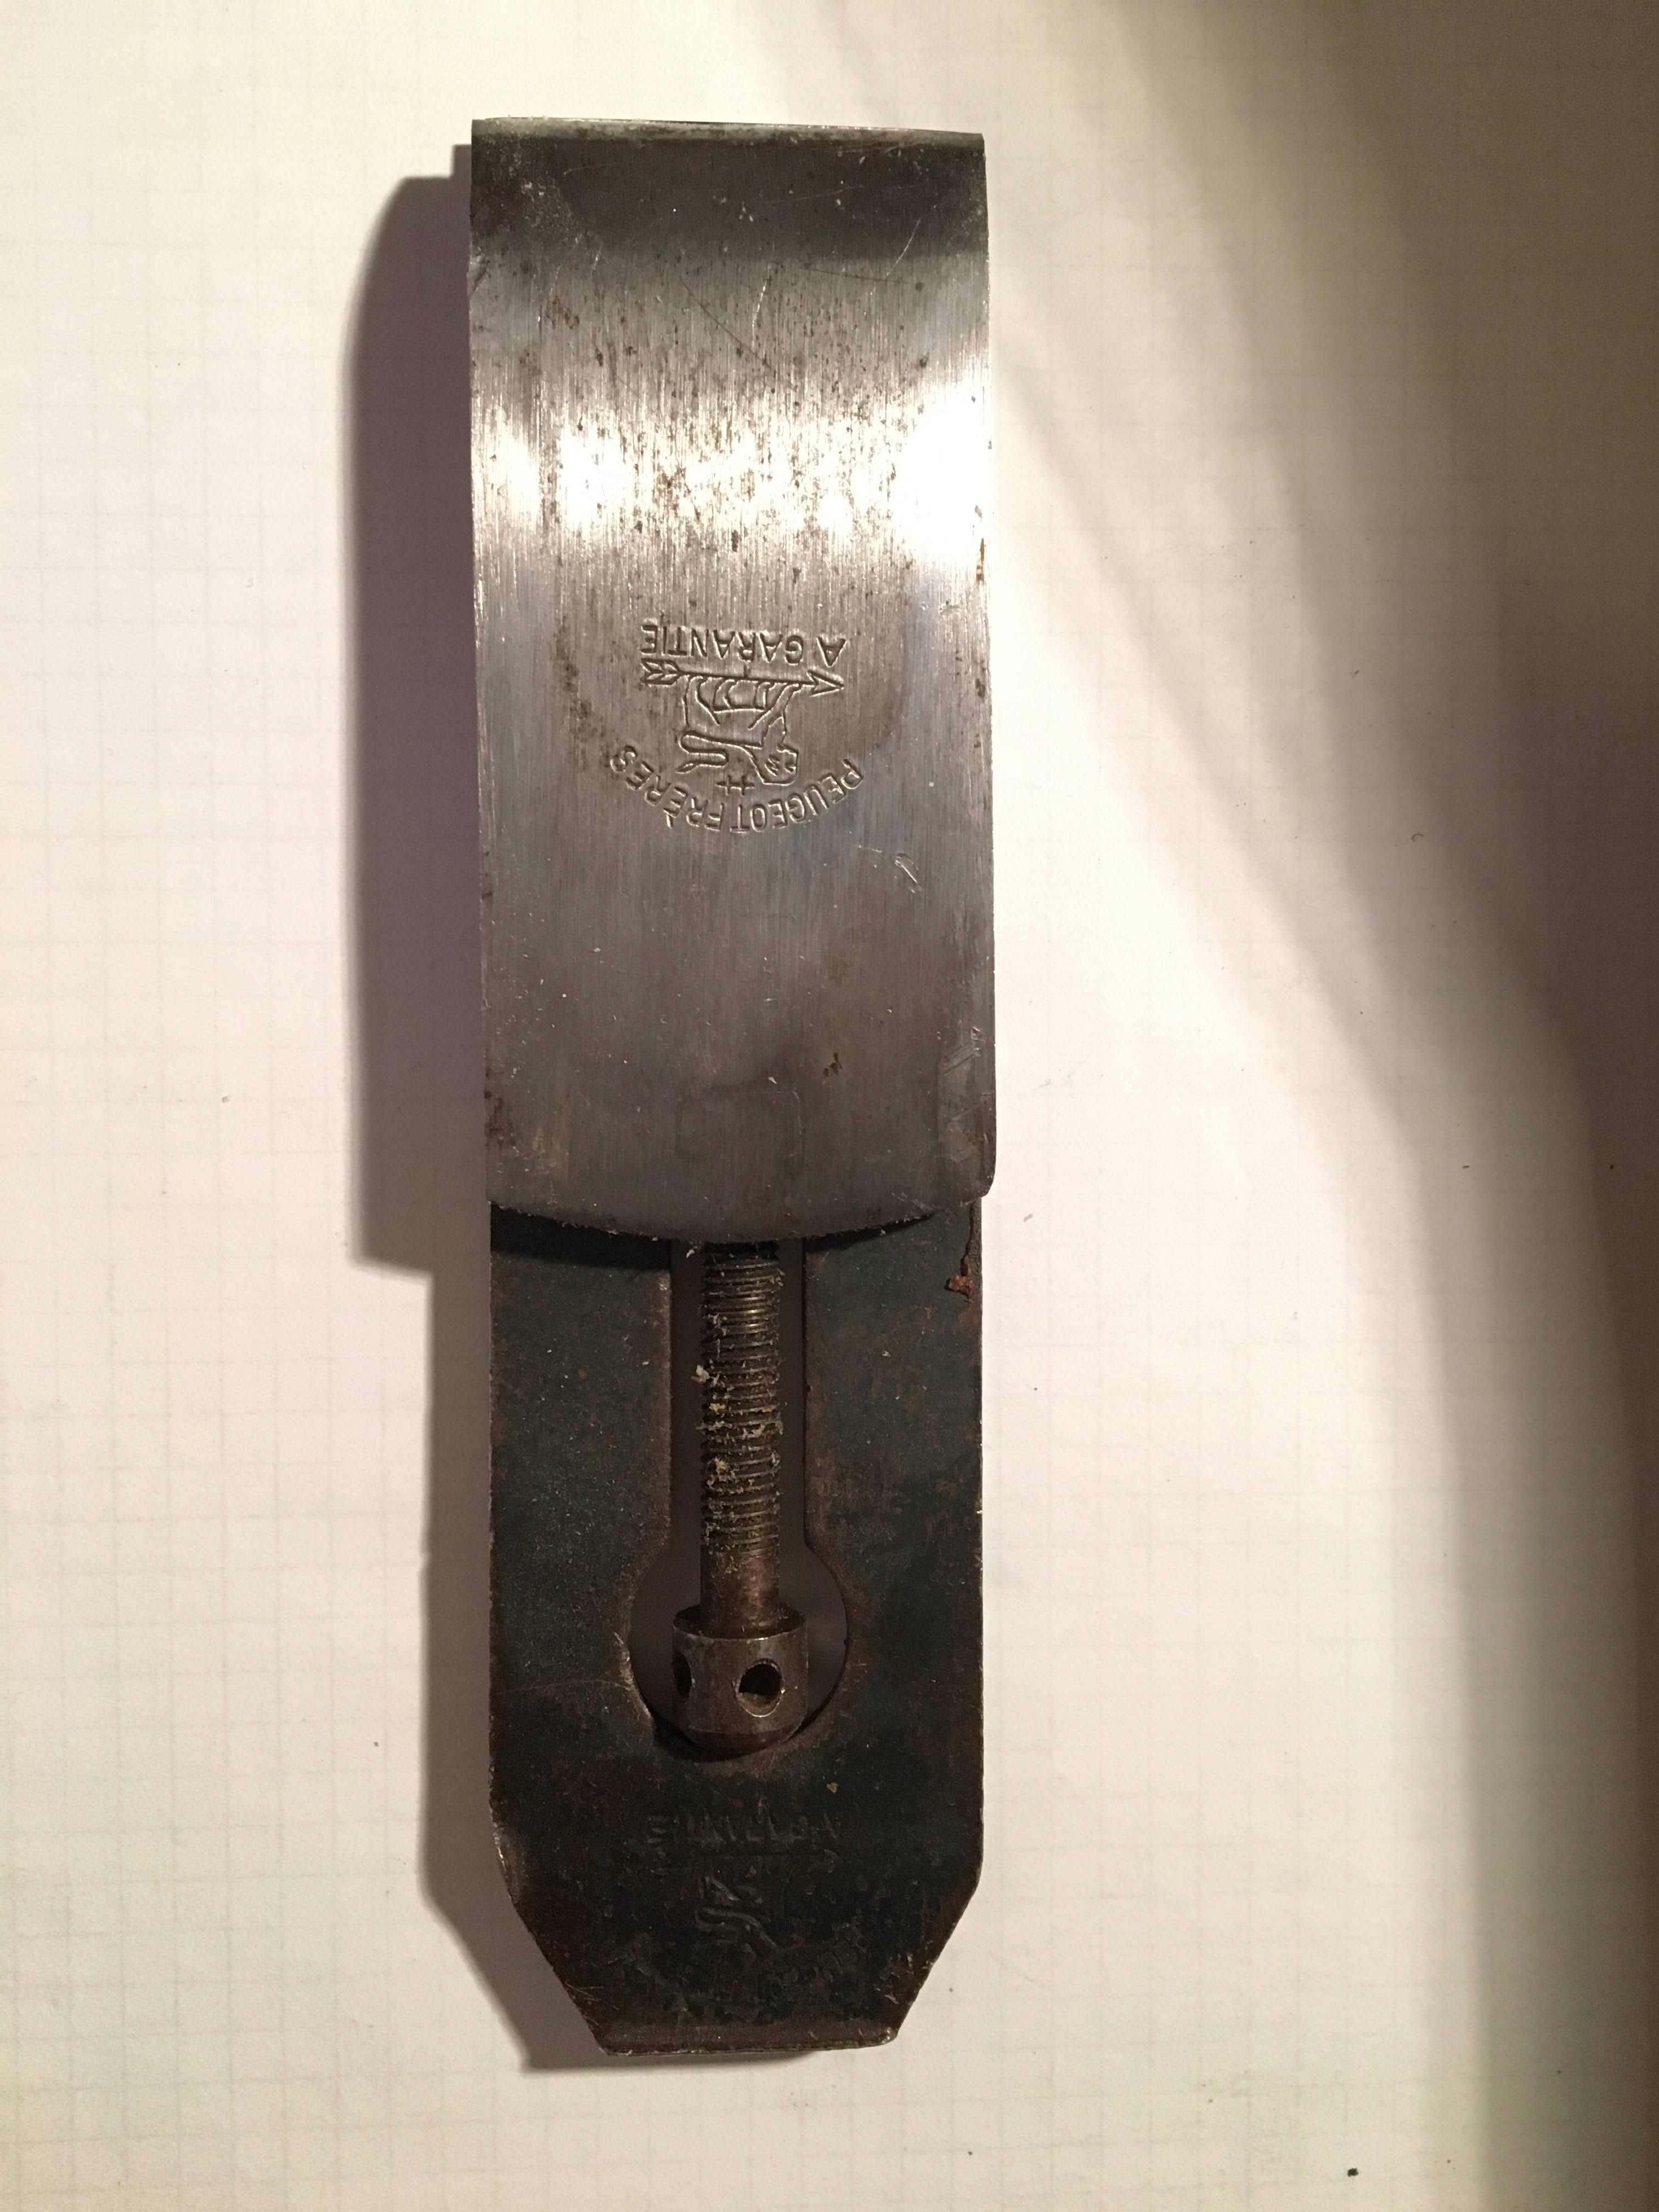
That plane has an interesting mechanism to set the chip breaker on the blade. A screw allows to move the chip breaker/blade up and down. The head of the screw goes onto a pin at the top of a slot in the blade.


Chip breaker mechanism
The screw head in the blade. The blade is
stamped Peugeot Freres Garantie.


The chip breaker shows some sign of rust.

Rusty chip breaker.

I cleaned it using my usual combination of polishing compound for silverware.

Chip breaker looking better now...
...and shiny.


The blade was totally dull and looked like having been ground but never honed. The grinding made a hollow on the blade bevel. I sharpened it starting with 220 grit, followed by 1000 and 4000 then up to 8000 grit. I finally used the leather strop for final mirror polishing.

The blade sharp and clean.

I did not clean the whole blade surface but only a third of the length on the bevel end.
I put back the blade and chip breaker assembly in the plane and after few adjustment the plane was ready for a test run.

Nice curly shavings.

This plane is truly a pleasure to use. I applied some beeswax to the sole and it is rubbing incredibly smoothly on wood.

Clean and back to work.

This plane will certainly be one of my favorite from now on, I really like the feeling of wood on wood and it is cutting the wood very nicely.