Showing posts with label mitter box. Show all posts

Monday, March 11, 2019

Vintage tools: Stanley 246 miter box - Final

Finally we are there, the restoration of the miter box and saw is done.
Saw tote is back on its blade and the sacrificial board is fixed to the metal base.
The box is back screwed on its stand that has received its coats of stain, oil and shellac.

The Stanley 246 fully restored and fixed to its stand.

Overall the miter box and saw look great and works great too.
It was a very nice projects and will be a very useful addition to my shop.

Tuesday, March 5, 2019

Vintage tools: Stanley 246 miter box - part 5

Today I took care of saw tote finishing. I applied two coat of amber shellac on one side and I am pretty happy with the result. It gives a nice warm color.

The tote after 2 coats of amber shellac.

I then finished to cleanup rut of some parts, more precisely the stop bar stand. The stand is nice and shiny for its age.

The little stand, still shiny at its age!

Finally I applied a coat of wood conditioner and stain to the box wooden stand.
This is all for today, not a big day but this is all the time I have.

Monday, March 4, 2019

Vintage tools: Stanley 246 miter box - part 4

After having stained the saw tote (see previous post), today was time for a finish primer. I started to mix boiled linseed oil with turpentine and mineral spirit for the first coat (1/3 part). I found a very nice way to make a mix like this or like wiping varnish. I used a kind of bottle in soft plastic used usually for kids drink. Easy to mix, easy to close, no drip, perfect for me.

Kid drink soft plastic bottle, ideal to mix oil and thinner.

After applying it on the tote I left it penetrate for 30 minutes, then wiped of the excess and left the tote dry for 2 hours. It will then received a coat of straight boiled linseed oil.

The tote after the a coat of thinned boiled linseed oil.

Waiting for it to dry I polished the saw bade with a metal polish paste. This is a product used usually to polish silverware but I found out that it is working nicely on saw blades. Apparently it also protect against oxidation, but this time will tell.   

Polished saw blade.

The saw blade is now far cleaner than when I got the saw and I am pretty much satisfied. I would have liked to get the etch more visible but at least it is still there.

When I got it the miter box came mounter on a stand that goes on the bench. I started to plane it to get it nice and clean so I can stain it the same color as the saw tote, this will be nice in the middle of my bench.

Next steps will be to apply a coat of shellac on the tote and stain the wooden stand, I am almost there!

Sunday, March 3, 2019

Vintage tools: Stanley 246 miter box - part 3

Last time the miter box base was ready and was only missing some hardware like tie rod, length stop etc.
I opted to work first on the saw as I am eager to see it back on the base. After the tote has been removed, the first step is to clean the blade.
The blade was not very rusty, just surface rust and oxidation but needed a good cleanup.  The teeth are quite sharp what means that this saw has barely been used. To clean the blade I used a rust remover that I generously applied on the blade. 
The rust remover applied on the blade.
Nice green slime.

After 30 minutes I rubbed the green slime with 0000 steel wool, wiped it with rag and rinsed it with water. This product gives really good result and dissolve the rust incredibly well. Only drawback is the green die it contains, it makes nasty stains, better to wear gloves!

I swear next time I will wear gloves so
I won't look like Hulk

After this treatment I rubbed the blade with WD40 and 600 grit wet sandpaper .
Blade cleanup revealed the lovely Stanley Sweetheart etch that I wanted to preserve. Hopefully I will be able to make stand up a bit more.

Faint Stanley Sweetheart etch
The next step for the blade will be a good polishing using some metal polish paste.

For now time to switch to the saw tote. I sanded it t bare wood and stained it. I opted for a red chestnut tint that gives a nice reddish brown color.
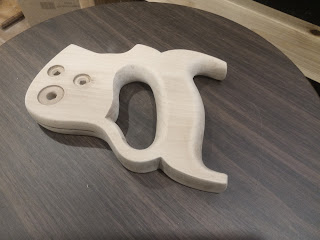
The tote sanded to bare wood.

I left it dried for 10 minutes I wiped it with a clean cloth. I will let it dry for a day before applying a mix of linseed oil and turpentine.

Stained tote.

Waiting it to dry I started to make a replacement for the sacrificial board. I used a scrap piece of Larch wood, a left over of some flooring I made at home.
I planned the tongue and grove and gt the exact size of the original board. I then sawed and chiseled the little notch on each side to leave space for the front upright of the box. 
Carving the notches for the front upright.
I will keep the original floor stain a I want something not too dark.

Dry fit of for the new board
Next step will be to apply finish to the saw tote and polish the saw blade.

Friday, March 1, 2019

Vintage tools: Stanley 246 miter box - part 2

In the last post I started to cleanup the miter box base.
The base is now done or at least clean enough for me as I do not want to loose the patina this old lady got while aging.
It is now the turn of the uprights. They both look pretty good but show some rust and dirt.

The back upright in its original state.

First step was to disassemble the upright in pieces so I can clean it thoroughly. This is easier than I expected. 

The upright disassembled (some parts
are not shown as they were already
in the rust remove bath)


At first I was a bit cautious as I expected to see some little piece or spring or I do not know what that I would not have been to put back in pace but nothing like that.
In fact you just have to remove 2 screws at the top and everything comes apart.
I then applied the same principle as for the base, scrub every piece with steel wool and WD40, wipe everything clean and apply a thin coat of light oil.


Inside the saw guide, a lot of gunk.


I took particular care of the saw guide interior side and the little bearing so to ensure a soft saw movement. There was quite a lot of dust and gunk inside but nothing that a good scrubbing cannot clear out.


For the little pieces that were hard to scrub I used a rust remover, I plunge the pieces in it during 30 minutes, lightly rub them and rinse them with water. The final result after a coat of light oil is very nice, at least cleaner than what it was.

One upright cleaned and reassembled.
The next picture shows both uprights cleaned and back in place on the miter base.

Uprights cleaned and back in place.
 Next steps will be to clean the tie bar, stock guides and length stops then will come the time to restore the saw.


Thursday, February 28, 2019

Vintage tools: Stanley 246 miter box.

Few days ago I got lucky enough to find a very nice Stanley 246 mitter box dated back from the Sweetheart Stanley era. I was fortunate to find one totally complete with no missing part, not even the little cam that is screwed on the saw for one hand triggering, not even the length stop stand. Even the sacrificial base board is the original one!

Stanley 246 [picture from seller]
After a good cleanup it should looks very nice.

I started by removing all moving parts like stock guide, length stops etc. I then took the uprights apart and removed the base board so only the base remains.

The miter box upside down while taking it apart.

The base it self is not very rusty and does not show any sign of abuse and still retaining most of it blue japanning. A good cleanup with a brush and oil should put it back to smooth usage.

Base board remove, ready for gentle scrubbing.
To remove the light rust showing underneath the base I sprayed WD40 on and used steel wool to gently scrub it. The result was good to me.
Note: the goal here is not to get a looking new miter box that will shine under the lights but to clean it and put it back to good usage while retaining a nice patina.

Right side before cleanup
Left side after cleanup.


After rubbing with WD40 and cleaning the residue with a rag, I used a magnetized screwdriver to remove any steel wool remains as this thing has the nasty tendencies to get into any angle and hole.
I then used light oil to wipe all parts so to prevent further rust.
Below some pictures of early results.
The miter box back on its feet after a good cleanup of the under side.
Need to clean this side now.


Front angle dial.

Front identification plate.

Next steps will be to clean the top side and the uprights and lubricate all moving parts. Then it will be time to clean the saw. More fun to come this evening!