
As mentioned in a previous post, one of my projects is to build two drawers for my workbench. I choose to go with box joints assembly with protruding tenon on the drawer front. Viewed from the side it should look like this:
 |
| Side view of the drawer. |
First thing is to cut the boards to length. This time I choose to use poplar boards directly sourced from a local hardware store and already planned as I don't have time to go to the sawmill to get raw boards and plane them.
To cut the board I used my freshly restored Stanley 246 miter box. There are two things I really like with this miter box. First you can cut board up to 8"3/4 inches with the front upright in the forward hole position.
To cut the board I used my freshly restored Stanley 246 miter box. There are two things I really like with this miter box. First you can cut board up to 8"3/4 inches with the front upright in the forward hole position.
 |
| The upright in the forward position so to be able to cut wider boards. |
The second, even if not often used, is the ability to cut angle up to 60 degrees when usually boxes only allow 45 degrees. This is the reason why there are two notches in the sacrificial base board so the upright can get to this angle.
 |
| The notch in the board allowing the upright to go to max angle. |
The drawers are 31" wide and 27" deep, I used a 1x8x6 board for the drawers face and 2 1x6x8 for the side and back.
It was really a pleasure to cut these on the miter box with the hand saw, the cut is perfect and no more dust in the air coming from the table saw.
 |
| Cutting using hand saw makes only a bit of sawdust. |
Next is to trace the box joints to cut but just before that I got a surprise... the board I used for the drawer face is 1x8x6 raw size, so in theory should be 3/4"x7"1/2 after planing, in other words the real size you get from the shop should be 3/4"x7"1/2.
 |
| Not even close to 7"1/2. |
However in my case the board width was only 7"1/4. I am fortunate that this will not matter much but next time I will check before making my plans.
I started to mark the drawer side, each side end will have 3 tenons, the middle one being 1"1/2 while the side ones only 1". I first measured and made my mark using a pencil.
 |
| Waste marked on the board. |
Then I used a chisel to make a kerf all around the cut I will do.
 |
| A kerf all around the mark. |
I then used my 8" saw to cut just shy to the mark.
 |
| Cut the waste with a backsaw. |
I just got this saw at auction and it is quite fun to use. I did not sharpened it at all and it is still cutting nicely for its age.
 |
| The 8" backsaw I used, small but nice to use. |
As I do not have any coping saw yet, I made many cuts side by side on the waste part so to ease its removal using a chisel.
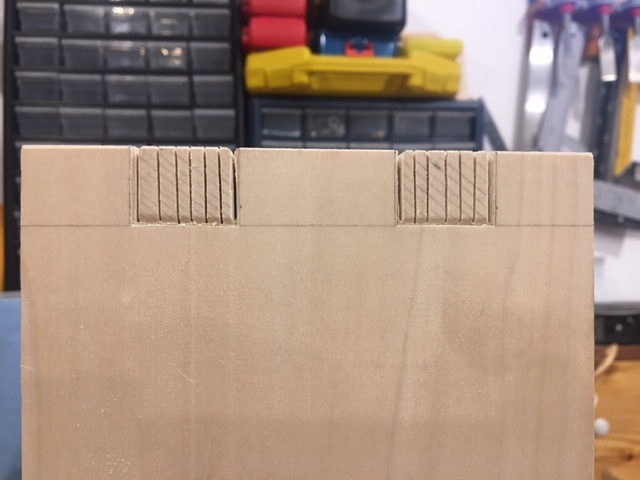 |
| Many cut to ease waste removal with a chisel. |
I used a mortising chisel to remove the waste and a regular firmer chisel finish the cut. Result is not bad for a first try.

Back side is done for this one, three to go before doing the front side.
No comments:
Post a Comment