With all the situation regarding the pandemic evolution of the famous infamous COVID-19, I am working from home since last week and for an unlimited duration. I was thinking that this would give me more time for woodworking as I am saving many hours in transportation but I was wrong. My workload increased with all the situations I need to care of so as a result I do not have more time in any way.
I am also glad that I went out to buy all the wood I need for my project as starting tomorrow all stores will be closed for at least the next 3 weeks.
This said I started the project by laminating the counter-top of the vanity. To make it I am using some left over from my previous TV stand project so it will be made by assembling four 2" thick pine boards.
 |
| The boards to be assembled. |
After having planed each pair of side straight for gluing, I did dry fit to be sure I was ready to proceed.
 |
| Dry fit before going further. |
When I was all set with everything easily reachable I went for gluing.
 |
| The boards glued waiting to dry. |
When dry I removed clamps, cleaned any extra glue, planed the top to thickness and smoothed it.
 |
| Smoothing the top. |
To smooth the top I used my Millers Falls #10 that I rehabbed recently. I love this plane so much. It is heavier than the #9 and really slides smooth through the wood without effort, a real pleasure.
I ended with a nice thick slab for the top and a nice big pile of shavings.
 |
| The top silky smoothed... |
 |
| ...and a pile of shavings. |
The next step was to cut most of parts to size, this made my evening busy.
 |
| A pile of parts cut to size. |
Next was to tackle the two front doors. These doors will be made of a pine frame enclosing a birch raised panel. I first tackled the raised panels. This is the first time I try to make a raised panel by hand and birch being a quite hard wood I did not expect it to be an easy task.
After marking both faces, I began with making the tongue all around the panel that will fit in the frame groove.
 |
| Working the tongue with my Record #778. |
For this I used my record #778 and I was surprised how well that wood was workable. Harder than pine it offers more resistance to the blade and cut clean and smooth, even cross grain.
 |
| Tongue done on to sides. |
When tongue were done, I use my Record 311 & 042 to plane the created angle in a slope that raises right to the line I marked previously.
 |
| Using shoulder/rabbet planes to create the raising slope. |
This result in a 1/2" tongue followed with a 1" raising slope.
 |
| On raised panel done, one to go. |
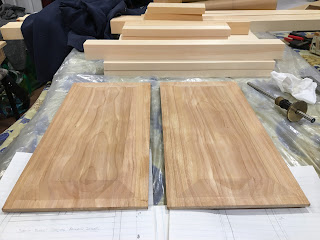
In no time I finally got my two raised panels done.
 |
| Both raised panels done. |
I have been very surprised about how pleasant it is to work with birch. First I love the smell of that wood and how much it is figured. I worked with it using power tool in the past but never tried with hand tools until today. It is planing very well, of course with sharp tools but like for any wood, and you don't risk any ding and far less split than wood like pine. Only negative point is the price tag if you want a planed board, a 6"x1"x8' planed board is sold for about 35$ up here so better not to waste it!
Next was to take care of the door frame, back to working with pine.
I first planed all the 1/2" deep grooves in stiles and rails using my small record 043.
 |
| Planing grooves on stiles. |
I checked if this was fitting the raised panels properly.
 |
| Checking raised panel fitting. |
I then cut the tenons on the rails that will fit in the stile's groove.
 |
| Cutting tenons. |
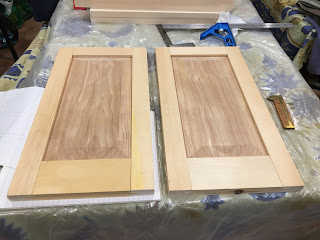
When done I did a dry fit of the door to get a preview of the end result.
 |
| Preview of the end result. |
Next I will start with making side panels and cutting groove and tenons on the remaining parts but this will be a different story.

Love the look of the grain on these panels.
ReplyDeleteBob, home schooling the grandkid
Lionel,
ReplyDeleteThe doors are beautiful. The contrast between the Pine and the Birch works well. Needless to say but I will, good job.
I wish we could get nice Pine here but so far unable.
ken
Lionel, on the raised panels I've made in the past, my bevel extends all the way to the edges and ends of the board. I like your panels with the flat (rabbetted) edges and hadn't considered making them like that. Was it hard to get the bevel to meet up nicely with the flat part around the edges?
ReplyDeleteMatt, it was not much difficult. I started by roughing the bevel, initially with my record 311 but found it was easier with my Millers Falls #8. I then used my narrow shoulder plane, record 042, to finish the section where the bevel meet the edge. Than finally my #8 again to finalize the bevel to the upper line. The only thing is to be careful on the last 2 or 3 plane pass in the angle with the tongue to go straight and also to check that the blade of the shoulder plane is not protruding as if it is it will mark the tongue (don't ask how I know lol).
DeleteKen left me a comment that made me think of a potential better way using a rabbet plane like the 778 with its full width blade. I will try this one next time just to see what way is easier for me.