Finally it is there and done. After long delays due to other priorities I am finally done with my bathroom vanity and got it installed yesterday.
This was a long run but it looks good to my eyes and more important my wife is happy about it!
Finally it is there and done. After long delays due to other priorities I am finally done with my bathroom vanity and got it installed yesterday.
This was a long run but it looks good to my eyes and more important my wife is happy about it!
| Stanley #113 |
| Scale for curvature |
| Stanley Rule & Level Co. |
| Dovetail riveted to sole. |
| A planed curve. |
Long time without any post as I have been very busy this summer, working on my boat renovation, my garden and so on. But now is a new post about some kind of woodworking, building my greenhouse.
It has been a while that my wife ask me for a greenhouse to start our seeds as well as working on flower pots, grow greens etc... So it was time to get to work and build it.
As with anything else I first made some plans of what I want to build with all the needed measurements and calculated sizes.
So here are the plans I started with:
| The side walls, 10 feet long... |
| ...the roof trusses... |
| ...and the front. |
The greenhouse will be 10' by 8' and is to be fixed to the side of the existing shed so the first thing I started with was to remove the shed vinyl siding and replace it with ship lapped boards. I had much pleasure doing this by hand and added a nice bead on each board, just because I could. AT the end I will cover all my shed that same way but this is another story.
Starting with the greenhouse itself, first thing to tackle was to install the base, made of 2"x6", supported by concrete blocks, and covered with 3/4" thick plywood.
I then built the two side wall by assembling 2"x4", nothing very fancy. The walls are screwed to the base.
| Different view angle. |
The lower part of the wall are to be closed by shipped lapped planks while the upper section will receive the windows. Windows are 42" high and will be made with acrylic panels set in wood frames.
I spent the following days to build the roof trusses using 2"x4", screws and metal plates. I know that this is not fine joinery and I wish I had the time to build the trusses using tenons joinery but clock is ticking and there is not much time left before winter knock at our door.
| Roof trusses. |
Before starting to install the trusses I had to make the front side and paint everything.
| Front side... |
| ...note the horizontal 2"x6" to separate bottom siding. |
I then installed the bottom siding. Took me few days to cut and prepare all the boards. For this I used 2"x6" too. May look a bit oversized for a siding but as this part will be in contact with snow every winter I wanted something strong.
| Bottom siding installed on one side... |
| ...and on front side. |
| Trusses, purlins and roof installed... |
| ...front view. |
I am from the ones who think that what we are now or at a given time is the sum of our past experiences, choices we made and people we met. The reason why I like woodworking is maybe the result of people I had the chance to meet before, who influenced my life, like my great grandfather who was a sawyer and carpenter.
Some 25 years ago, while doing some volunteering in a museum in France, I met a wood carver who was invited to that museum for a cultural exhibition. The name of that person was Norbu-la and he was coming from a Tibetan refugee village in Dharamsala in north India. The goal of that exhibition was to showcase art of wood carving in Tibetan culture by carving a Tibetan altar made of teak.
![]() |
| Norbu-la, Tibetan carver in front of his teak altar |
During his stay I had the opportunity to spend quite some time with him and to learn about how he was working and to give it a try.
| Example of the carver skills... |
| ...and of mine! |
This was also an opportunity to look at the tools he was using, especially that these were mostly homemade.
![]() |
| The carver tools, squares, saw, chisels, marking gauge. |
Among these tools some are particular to notice.
First of all, the coping saw. That saw was made with a piece of bamboo, shaped into a U form. Bamboo being very flexible it was keeping the tension on the blade like a spring, very clever.
The saw blade itself was very particular. It was made using a steel wire reclaimed from old tires inner reinforcement wires. The steel was quite mild but still very resistant. The wire was rolled on one side of the bamboo frame, serving as a reserve, and attached at the other end. Before being usable, the carver was cutting very small teeth in the wire using chisel and mallet. When the blade was broking, he would just unroll a new piece, cut the teeth and back to work.
Surprisingly that saw was cutting very well even in hard wood and was very nice and easy to use. The bamboo frame being very well balanced and the saw was easy to handle.
Other tools to notice were the carving chisels. A lot of them, the smallest ones, were made from motorbike wheel spokes. From what he told me the steel used for spokes is a very good quality steel that can handle a heavy tension. They used the spokes as the raw material that was forged into the final chisel. I can assure that these chisels were razor-sharp, my finger will never forget how easily it was to deep cut it.
To sharpen these chisels, the carver was using a black stone, that he carefully selected in the bed of a river and broke in two pieces to have a flat face. I do not know what kind of stone it was but it was very soft to touch and had a fine abrasive grain. He poured water on the stone and honed a chisel for a minute and he was done.
So looking at the quality of his work, and the simple tools he was using, one question comes to my mind:
Are the tools making the man, or the man who makes the tools?
Following one of my previous post the last part of my box to be done is the cover and handle. The cover is a simple pine board but I wanted the handle to stand out of the box so I used a piece of mahogany to make it.
I started with a small 11/2x5x1/2 mahogany piece that I marked to cut each end round. I then roughly saw the corners and got the final round shape with a chisel.
| Rough cut with a saw... |
| ...final shape with a chisel |
I then rounded the edge, first using a plane to get a bevel all around then sanding the remaining waste.
| First handle part done. |
I did the same for the second part, except that I started from a 1x41/2x1/2 piece of mahogany that will only be half rounded on its edge.
| Two parts done. |
The handle is made by gluing the two parts stacked.
| Handle final shape. |
I applied 4 coats of wiping varnish, by penetrating in the wood it highlights the reddish color of the mahogany.
| Handle afixed to the box. |
The handle is set to the box using four small wood pegs dark stained. The little wood pegs are protruding 1/16" from the top of the handle to give a "nailed" look.
Overall I am pleased with the end result. The handle could have been a bit more evolved in its shapre or better designed but I like the way it stands out from the box.
It was initially planned to be used to contains my wife birthday gift but as usually I was late so it became another gift by itself.
| A simple box |
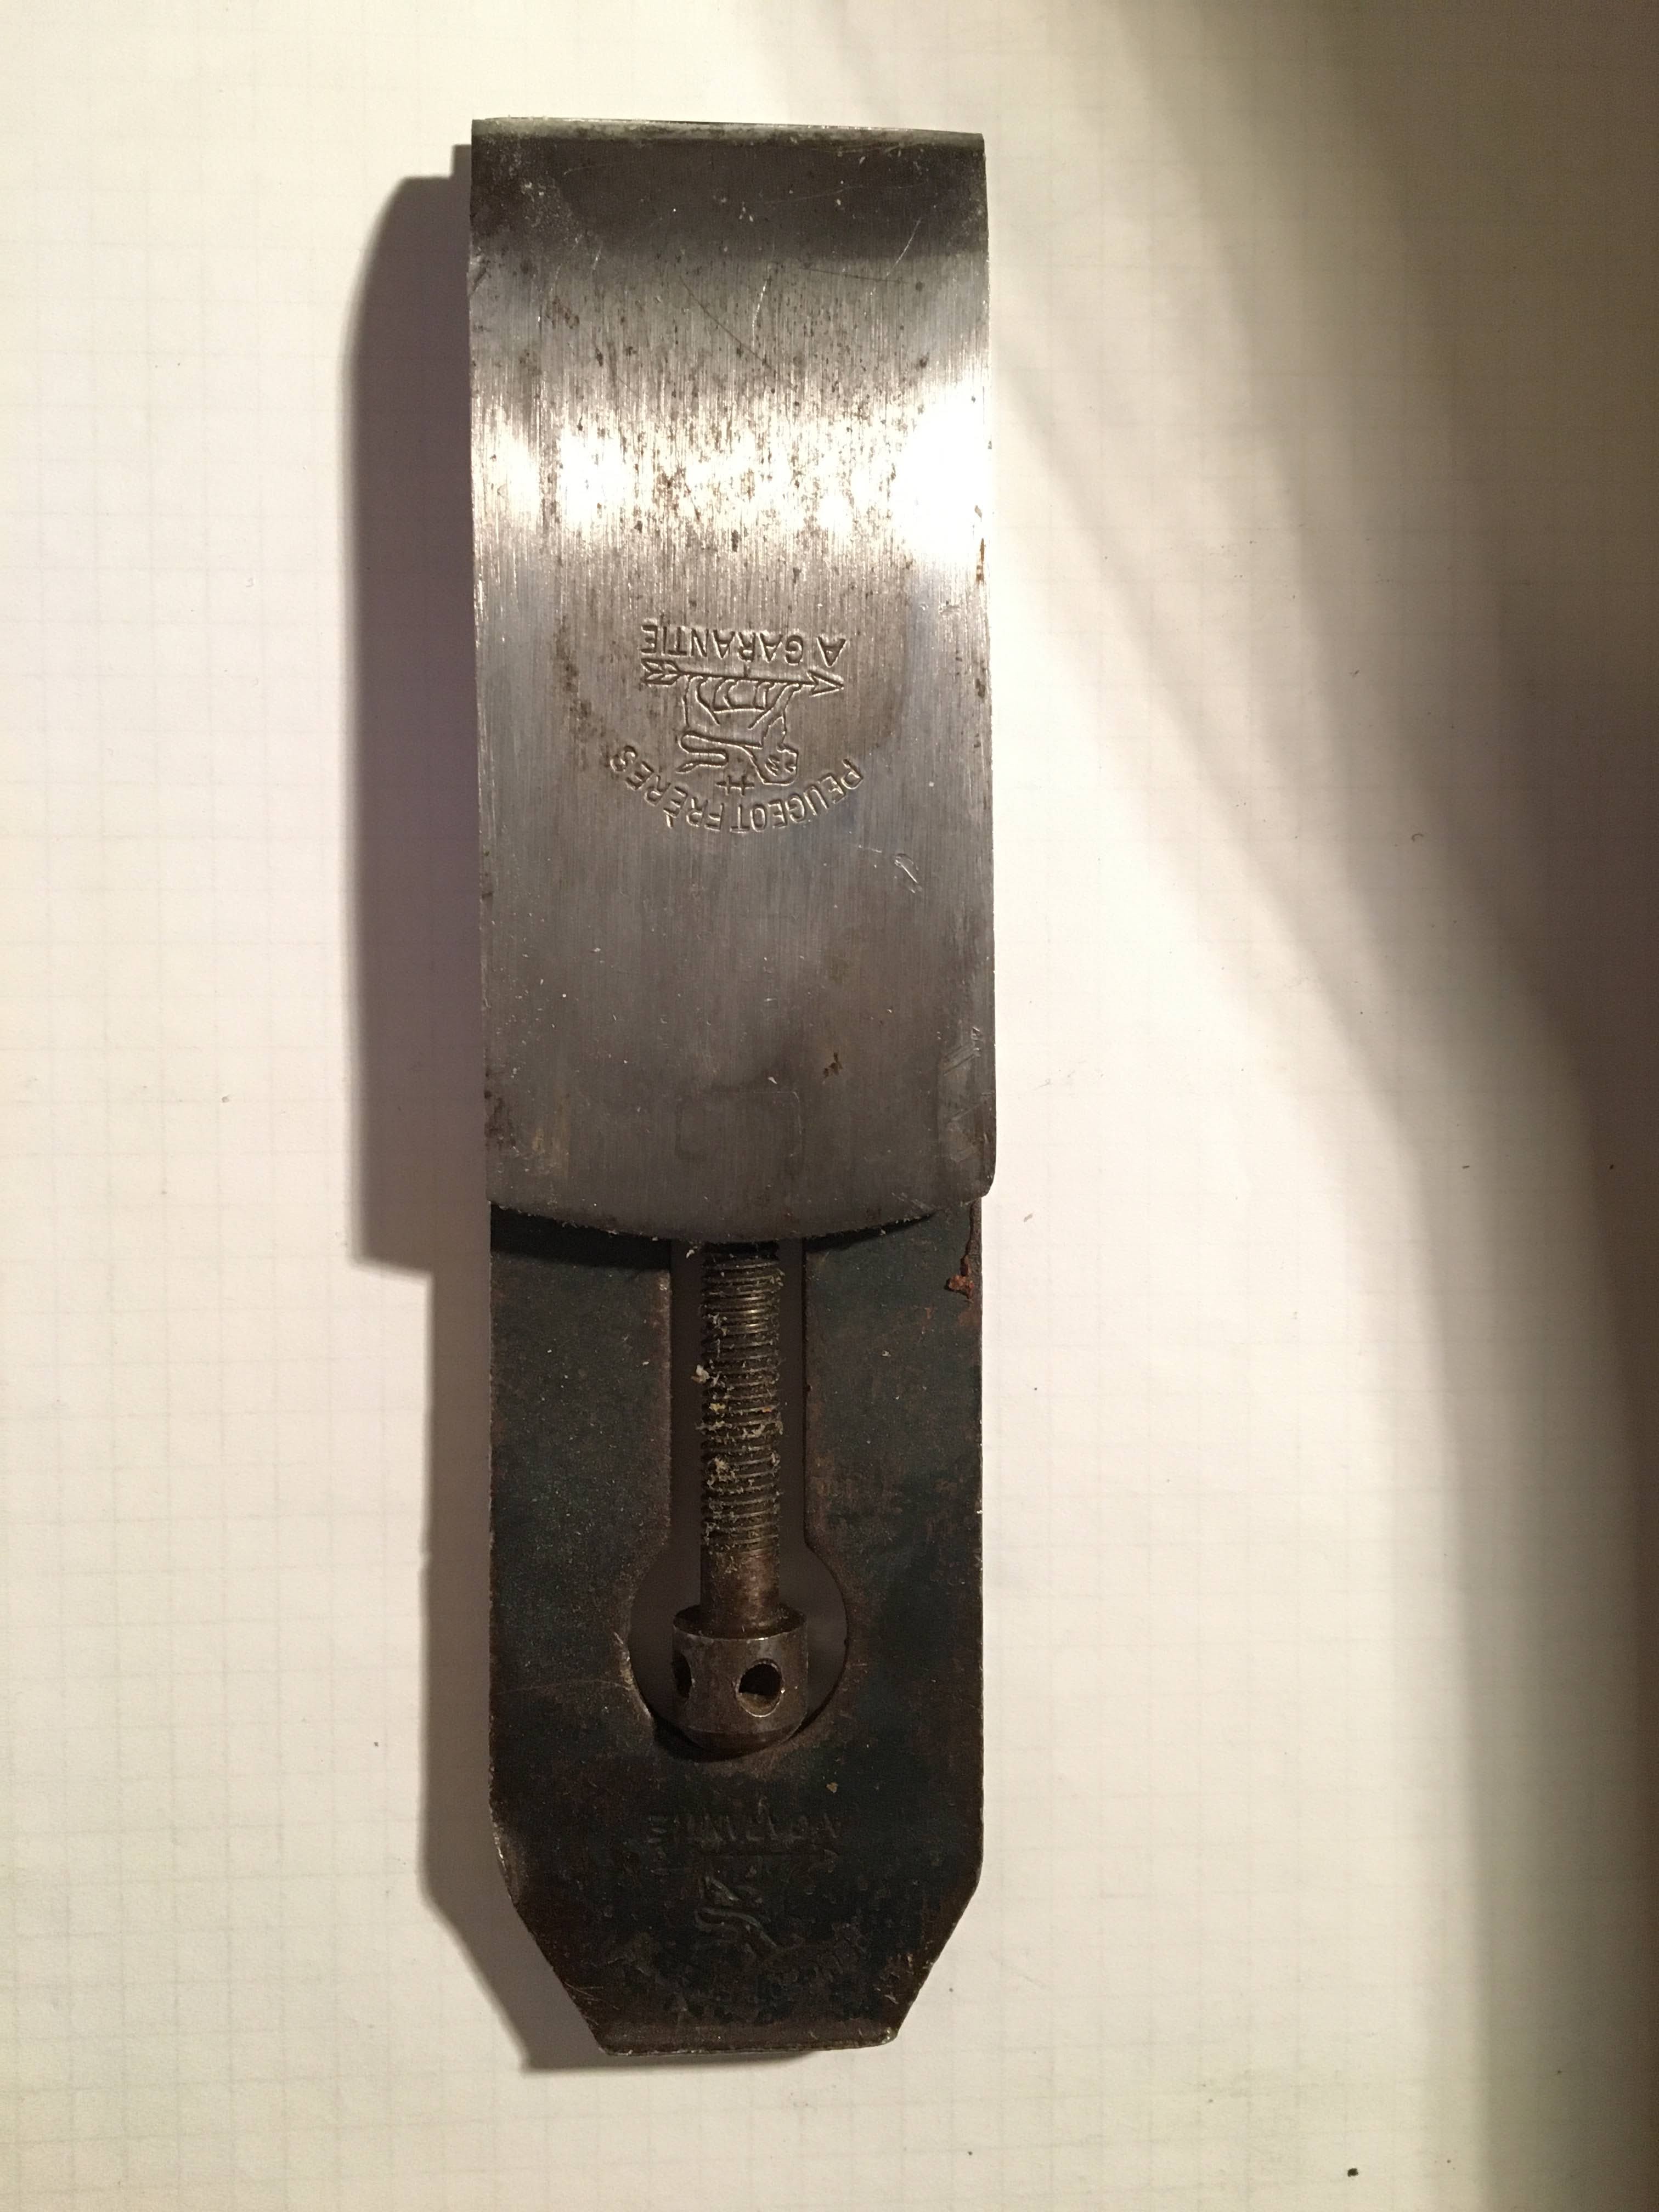
Few days ago, I received an email from Simon living in Netherlands about the dimensions of one of my Peugeot plane. Simon got a Peugeot blade assembly and wants to build the plane that goes along. So I made some pictures and drawings with measurements and here is the anatomy of a Peugeot plane.
| Peugeot 48 |
The plane is a Peugeot 48 (what is also the blade width measured in mm) and is made with Cormier wood (French naming) or Service Tree in English. For the naturalists, its scientific name is Sorbus Domestica.
Its length is about 93/8 inches (or about 238mm) what makes it a smoother plane.
Its particularity is the mechanism to move the blade.
| Blade assembly, top view |
| Blade assembly, side view |
I tried to be as precise as possible in my measurements, in inches as well as millimeters, but there may be some small deviations.
The picture below shows the side view of the plane wooden body (blade assembly and wedge removed).
| Plane body, side view. |
Below is a drawing with all the dimensions I was able to measure.
| Plane body side dimensions. |
Below is a picture of the plane body top view.
| Plane body, top view |
| Plane body top dimensions |
Below are two pictures of the plane wedge. Sorry for the shadow but I have no professional studio light so this as the best I could do.
| Wedge, top view |
| Wedge, side view |
| Wedge dimensions |
Last weekend was my wife birthday and instead of wasting some paper I thought about making another box to wrap her gift.
I used some Pine leftover from another project and adapted the box size to the available length. Of course the box had to be dovetailed so I thought of sharing my adventures with dovetails.
I read enough opinions and discussions about this subject to know that there is no answer to this question but only a personal preference. Speaking about personal preference, mine is to start with tails. The reason for that, if there can be any reason, is that I find easier to cut the tails and use them as a template to mark the pins than the reverse. At the end I don't think this makes much difference if you are used to the way you choose.
When thinking about my dovetails, the first thing I am looking at is the space I will need at each end for example to hide a panel groove.
| Tails marked on one board. |
It has been a long time since my last post, but still the butcher is alive and well alive. I have been busy with some gardening work, landscaping and all sort of outdoor pleasures but now that winter is back at our door it is time to be back to woodworking.
For a long time now I wanted to get a wooden brace for the beauty of the tool but also to use it. I always found some either too expensive or in very bad shape... until recently.
I was lucky to find a very nice one, made by Henry Brown from Sheffield. I think this one was made sometime around 1810 to 1830 but not sure exactly.
| Henri Brown brace. |
| Medaillon on the knob, Henry Brown from Sheffield. |
| The brace mouth in very good shape. |
| The bit release mechanism. |
| Brace bit tight in the brace mouth. |
| The brace and my bits set. |
| Each board is marked to recall its place. |
| Mortises marked on one rail. |
| Using one rail to mark the other. |
| First rail done. |
| First shelf dry fit alone... |
| ... and in its final place. |
| Both shelves in place. |